


Learning to play the piano is an exciting journey but for beginners all the notes can feel overwhelming. The repeating pattern of black and white keys may seem confusing at first. Fortunately, having piano keys labeled can make the learning process much easier. In this guide we’ll explore different methods to have your piano notes labeled effectively so you can start playing with confidence!
The musical alphabet explained
The piano keyboard follows a simple repeating pattern based on the musical alphabet. Before labeling, it’s essential to recognize this structure. Unlike the standard alphabet, the musical alphabet consists of just 12 notes, repeating across the keyboard:
A, A♯/B♭, B, C, C♯/D♭, D, D♯/E♭, E, F, F♯/G♭, G, G♯/A♭
Each octave on the keyboard follows this sequence, making it easier to identify notes once you recognize the pattern. You may notice that some piano notes have two names. These notes are called enharmonic equivalents. Dive deeper into this and other music theory topics with Skoove lessons!
How to label piano keys
Properly labeling your piano can help you learn faster and build confidence in note recognition. Follow these steps to label your piano keyboard accurately.
Step 1: Clean the piano keys
Before applying any labels, it’s essential to clean the keys to ensure that stickers or markings adhere properly. Use a dry or slightly damp cloth to remove dust, oils and residue. If needed, you can use a gentle cleaner specifically designed for pianos but avoid excessive moisture that could damage the keys.
Step 2: Choose a labeling method
There are several ways to label your piano, each with its own benefits and drawbacks. Select the method that best suits your needs and preferences.
- Dry-erase marker: This is a quick and temporary solution that wipes off easily. However, the markings can fade or smudge quickly during play. It is best suited for digital pianos or short-term practice sessions. Use a fine-tip dry-erase marker to write note names on the white keys and wipe them off with a dry cloth when done practicing.
- Sticky labels with letter notes: While they may leave residue when removed, they provide a clear and structured way to label keys. Beginners can use small dot stickers or cut sticky name tags to fit the keys. It’s best to label the portion of the keyboard you frequently use, such as the central octave around middle C.
- Color-coded dots: This method helps associate notes with colors, making recognition easier, especially for young learners. However, it requires a consistent system to avoid confusion. Assign each note a different color and apply small, colored stickers to the keys. Matching these colors to notation in sheet music can provide additional reinforcement.
- Pre-printed labels with letter notes and staff notation: These labels provide comprehensive visual aids, including note names, sharps, flats and corresponding staff notation. While they can be overwhelming for some beginners due to the amount of information presented, they are great for students who want a detailed reference. Pre-printed piano key stickers can be purchased online and applied carefully to the corresponding keys.
Step 3: Locate middle C
To label piano keys, start by identifying middle C. Finding middle C on the piano is a foundational aspect of learning how to play piano. It is the white key located directly to the left of the group of two black keys near the center of your keyboard.
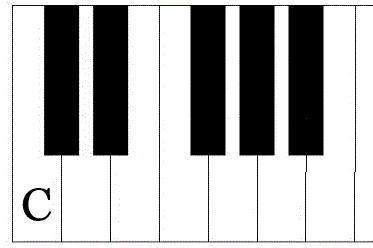
Step 4: Label the white keys first
Starting from middle C, label the white keys in order: C, D, E, F, G, A, B. Repeat the pattern across the keyboard.
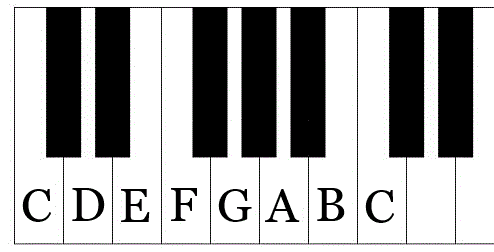
Step 5 : Label the black keys
The black keys represent sharps (#) and flats (♭). Label them as follows:
- The first black key in the two-key group: C♯/D♭.
- The second black key: D♯/E♭.
- The first black key in the three-key group: F♯/G♭.
- The second black key: G♯/A♭.
- The third black key: A♯/B♭.
Step 6: Use labels as a learning aid, not a crutch
While having a piano keyboard labeled can be a helpful learning tool, avoid relying on them for too long. As you become more comfortable with note recognition, gradually remove the labels to strengthen your ability to identify notes without visual cues.
By following these steps, you’ll create a well-labeled keyboard that enhances your learning experience and supports your musical progress.
💡Top tip: Instead of labeling all keys, some learners prefer labeling only essential notes to encourage memorization. Try marking only C, E and G as reference points.
Labeling different sizes of pianos
Now you understand the theory behind labeled piano keys, let’s look at how this can vary. The process of how to label a piano depends on the number of keys your keyboard has. Here’s a quick guide to get your piano notes labeled on different sizes ok keyboard :
How to label an 88-key piano (full keyboard)
A standard piano has 88 keys, including seven full octaves and a few extra notes at each end. Labeling should start at middle C and extend outward.
Here is a diagram showing 88 labeled piano keys:

How to label a 61-key piano
A 61-key keyboard lacks the lowest and highest octaves but retains the core notes. Middle C remains the reference point for labeling.
Here is a diagram showing 61 labeled piano keys:

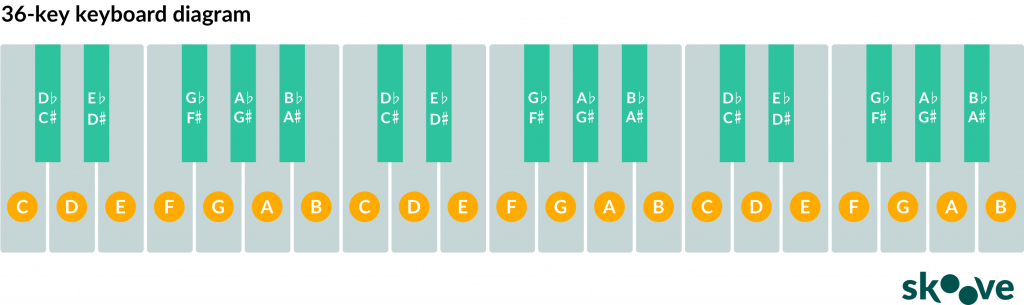
How to label a 36-key piano
Smaller keyboards, often used for beginners or children, still follow the same note pattern but have fewer octaves. Middle C is still a central anchor point.
Here is a diagram showing 36 labeled piano keys:
Common mistakes to avoid
While labeling piano keys can be a helpful learning tool, there are common mistakes that can slow progress. Be aware of the pitfalls of labeled piano keys. These top tips can help you use labels effectively without becoming too dependent on them.
When labeling your piano, watch out for these common errors:
- Using permanent ink on expensive pianos.
- Over-labeling every single key, which can lead to dependency.
- Using unclear or oversized labels that obstruct the keys.
- Skipping black keys, making it harder to learn sharps and flats.
- Not cleaning keys beforehand, leading to adhesive residue.
Label away!
Having your keyboard notes labeled is a great way to improve your learning speed and confidence. When using stickers, markers or colored labels, make sure your markings are clear and removable. As you become more familiar with the keys, you can gradually remove the labels. Now that you have your piano notes labeled you can continue to enjoy your musical journey. Happy playing!
Author of this blog post:
Matthew Dickman

With over a decade of experience in music education Matthew holds a BA in Music from Paul McCartney’s LIPA and an MA in Composition from the University of Salford. Mathew has developed a distinctive compositional voice and approach to music theory education through his research and work in the music industry. Matthew’s writing for Skoove combines experience from orchestral and media composition, and as a gigging jazz musician, to create a wholistic and accessible pedagogy for musicians of any level. Away from music, he enjoys reading and exploring nature to expand his horizons and knowledge contributing to his holistic teaching style.