
Confused by piano notes? You’re not alone. When you start learning piano, the best place to begin is understanding how notes are named and where to find them. Knowing the notes on the keyboard and how to read them is important if you want to play your favorite songs. This essential Skoove guide is here to help you feel more confident about navigating your way around the keyboard and understanding sheet music. We will learn how to read piano notes, how to play them in time and how to follow the special instructions that tell you how to play and how fast to go. Let’s get learning!
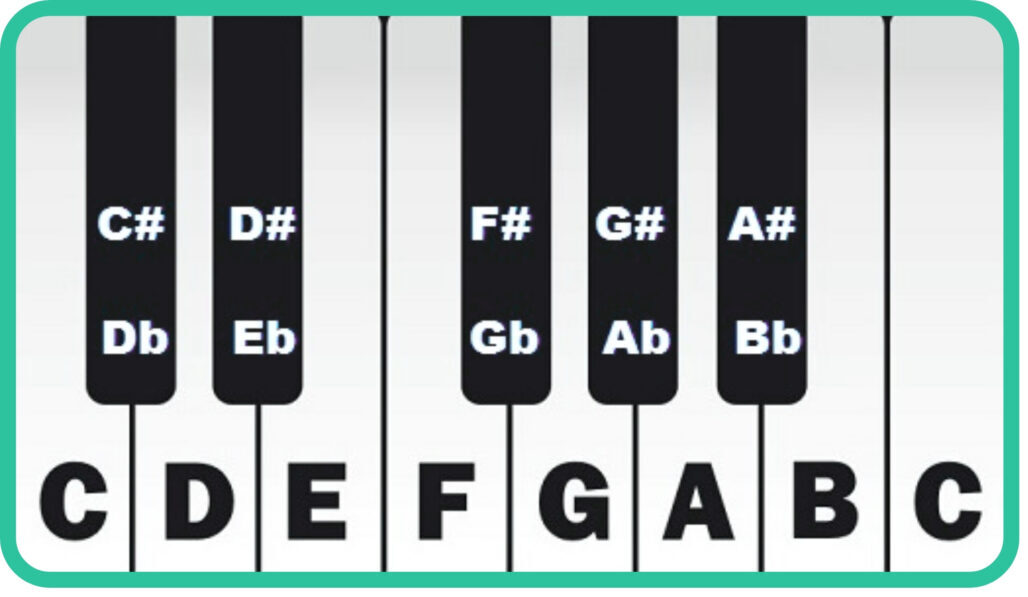
Each of the musical notes on a piano has a letter name. These letters are ordered just like the English alphabet. In music, we use letters A to G after that the sequence loops again from A. Here are all the simple note names for the white notes on a keyboard:
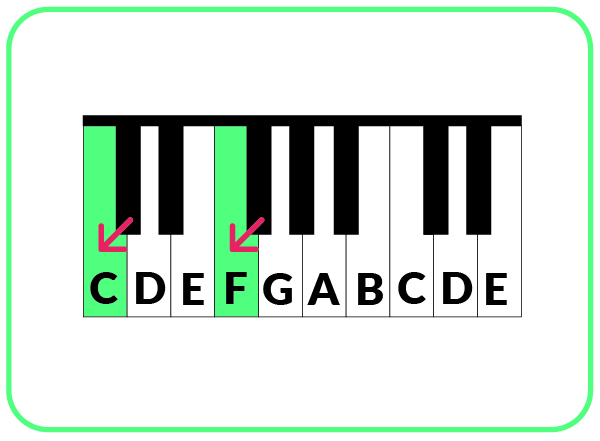
If you’re looking to learn keyboard notes for beginners, it’s best to start by focusing on the white keys. The black piano keys have names too but we will get to that shortly. If you’re unsure where the notes on a keyboard are, remember:
- C is to the left of the group of two black notes
- F is to the left of the group of three black notes
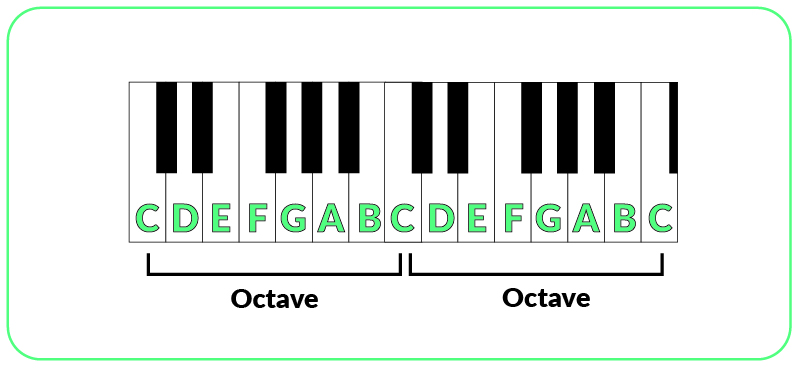
All the notes on piano are arranged in octaves (groups of right notes) with each octave consisting of eight notes (C, D, E, F, G, A, B, C). Moving further left on the keyboard lowers the pitch while moving further right raises the pitch.
- Fall in love with the music - Learn your favorite songs, at a level suitable for you.
- Enjoy interactive piano lessons - Explore courses covering music theory, technique chords & more.
- Get real-time feedback - Skoove's feedback tells you what went well and what needs practice.
Sharps and flats (black keys)
Not all piano music is played with the white keys. Piano notes on sheet music use symbols known as sharps and flats and naturals which alter written frequencies.
- Flats (♭) lower a note by a half step, moving to the nearest black key to the left (or white key if there is no adjacent black key). E.g. E♭ (E flat) sits just to the left of E.
- Sharps (♯) raise a note by a half step, taking it to the closest black key on the right (or white key if there is no adjacent black key) E.g. G♯ (G sharp) is positioned directly to the right of G.
- Naturals (♮) are the white keys that represent the standard notes without any alteration. E.g., C♮ (C natural) is the regular C found on a white key.
How to read piano notes?
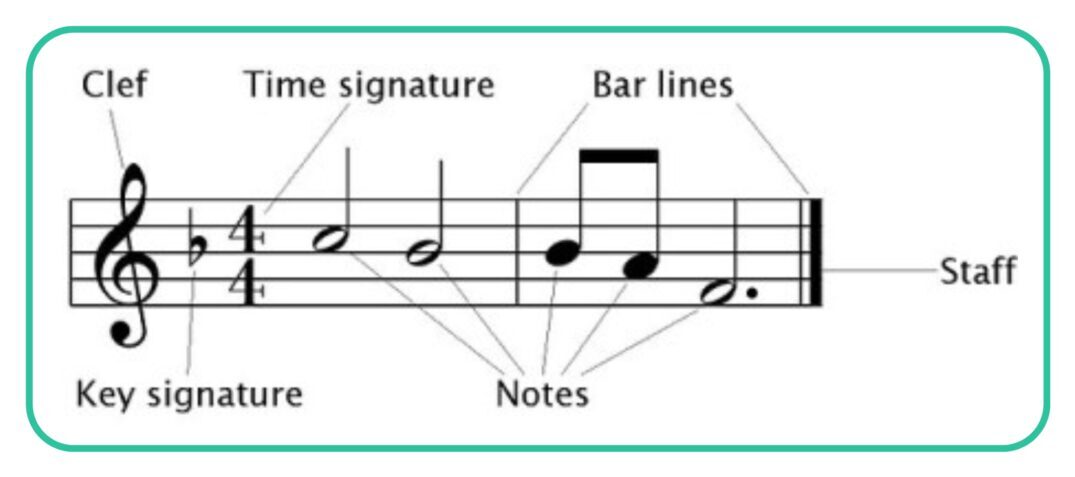
It’s important to know how these notes are written on a page. Written pitches are conveyed through the treble and bass clefs, the staff, key signatures and accidentals. Let’s break down the key components of easy piano notes for beginners.
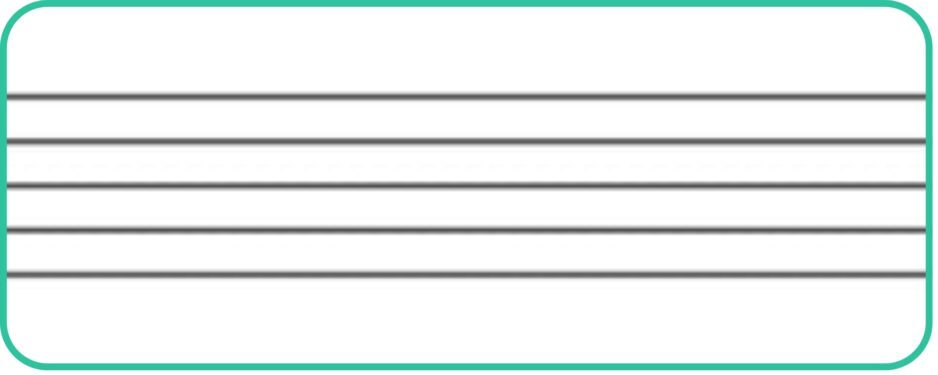
The staff
The staff is made up of five horizontal lines with four spaces in between them.
Sat on the staff at the start of a piece of piano sheet music, you will see two symbols. These are the treble and the bass clefs. These symbols dictate how you read the notes on a staff.

Usually the right hand notes are written in the treble clef and left hand notes are in the bass clef.
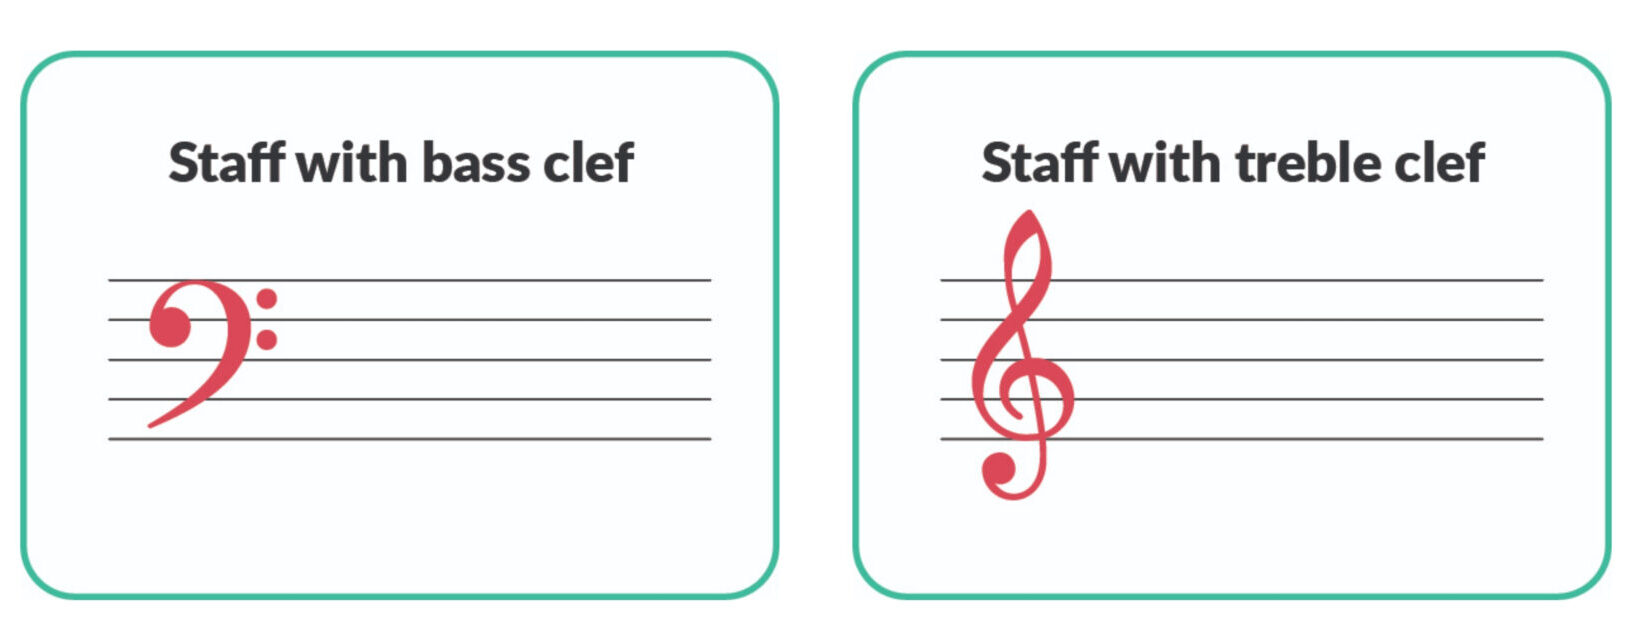
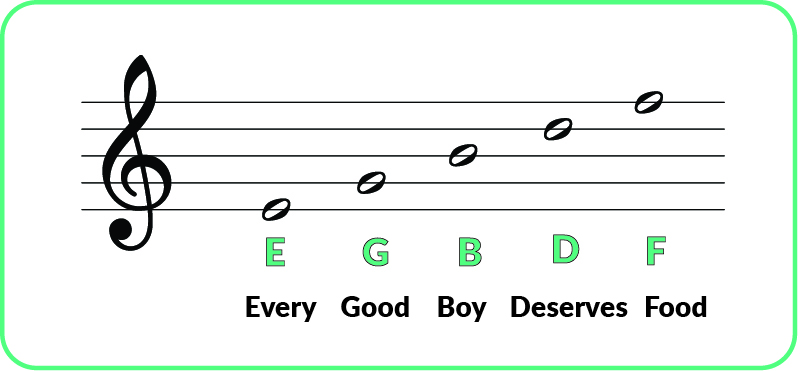
Treble clef:
To remember these treble clef notes notes you can use this handy mnemonic:
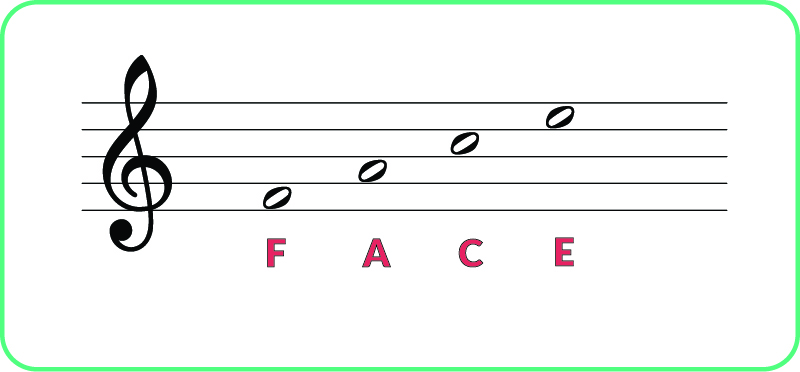
The labeled piano notes for the spaces in the treble clef spell the word “FACE”, you can remember this as “FACE in the space”. Notice that combined these memory aids start from the bottom and move upwards alphabetically and apply to just lines or just spaces.
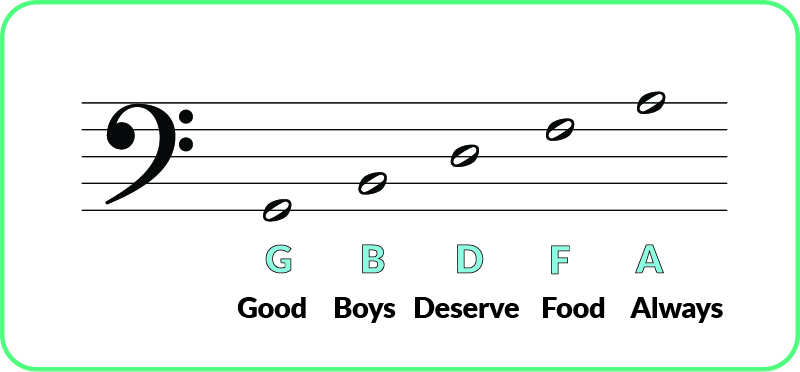
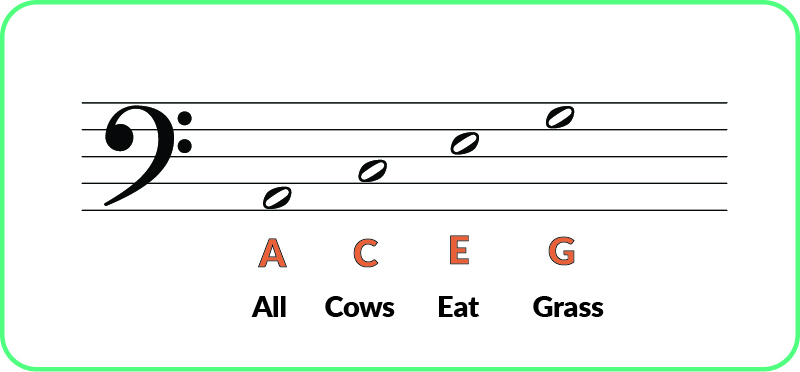
Bass clef:
The bass clef follows the same principle but with different note letters. Let’s look at a fun way to remember them:
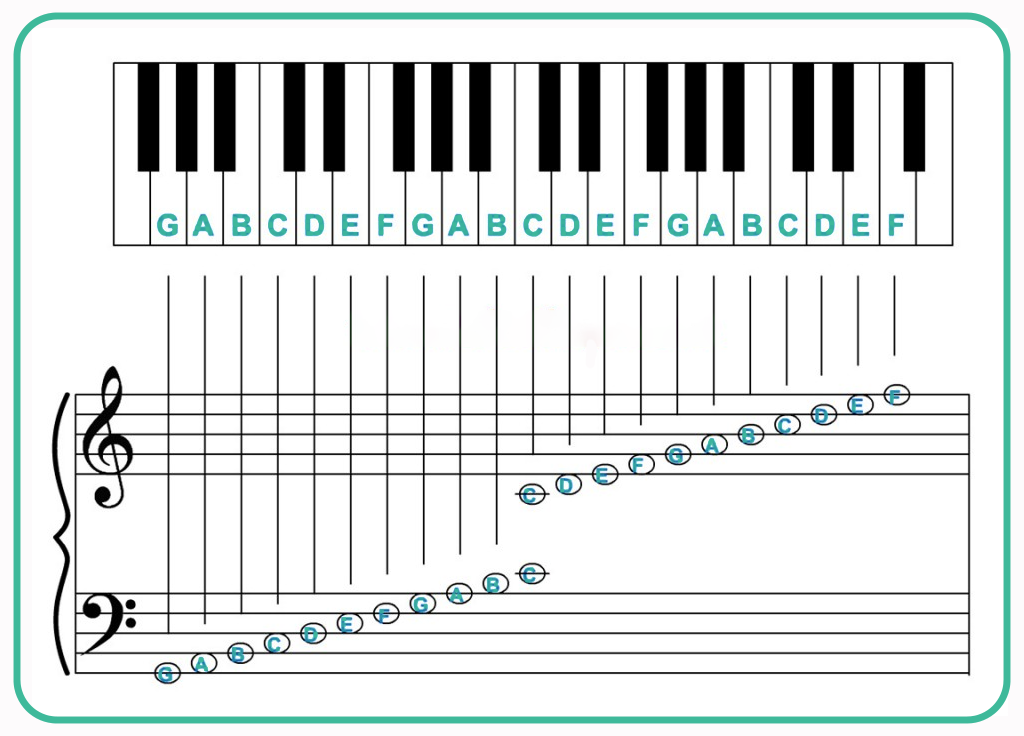
Piano notes chart: The keyboard notes labeled
In piano music two staffs (one treble, one bass) are held together by a brace. This is known as a grand staff. Notice how all piano keyboard notes stick to a repeating pattern across the keyboard following the musical alphabet. This chart with all the piano notes labeled is a great way to visualize the relationship between the bass and treble clefs, with all note names clearly labeled.
Our Skoove lesson on the song Twinkle Twinkle Little Star is a fantastic way to practice note recognition for beginners.
Reading key signatures
Learning how to read key signatures is an essential skill for any musician. Let’s go through a step-by-step guide to help you understand this concept:
The key signature will consist of either sharp (♯) or flat (♭) symbols on certain lines or spaces at the start or within a piece of music. These sharps and flats indicate which notes are to be altered throughout the piece.
Sharps and flats in key signatures will always appear in a specific order.
- Order of sharps:
- The mnemonic Father Charles Goes Down And Ends Battle represents the order of sharps as they appear in key signatures: F♯, C♯, G♯, D♯, A♯, E♯, B♯
- Order of flats:
- The reverse of the sharp mnemonic, Battle Ends And Down Goes Charles’ Father, represents the order of flats: B♭, E♭, A♭, D♭, G♭, C♭, F♭
How to play in time?
Now we have learned how to read pitches and we can look at how to play in time using written music. This will allow you to read and write music that follows a particular rhythm or pulse. Let’s look at the two main concepts behind musical timing, note values and time signatures.
The length of note and rest values
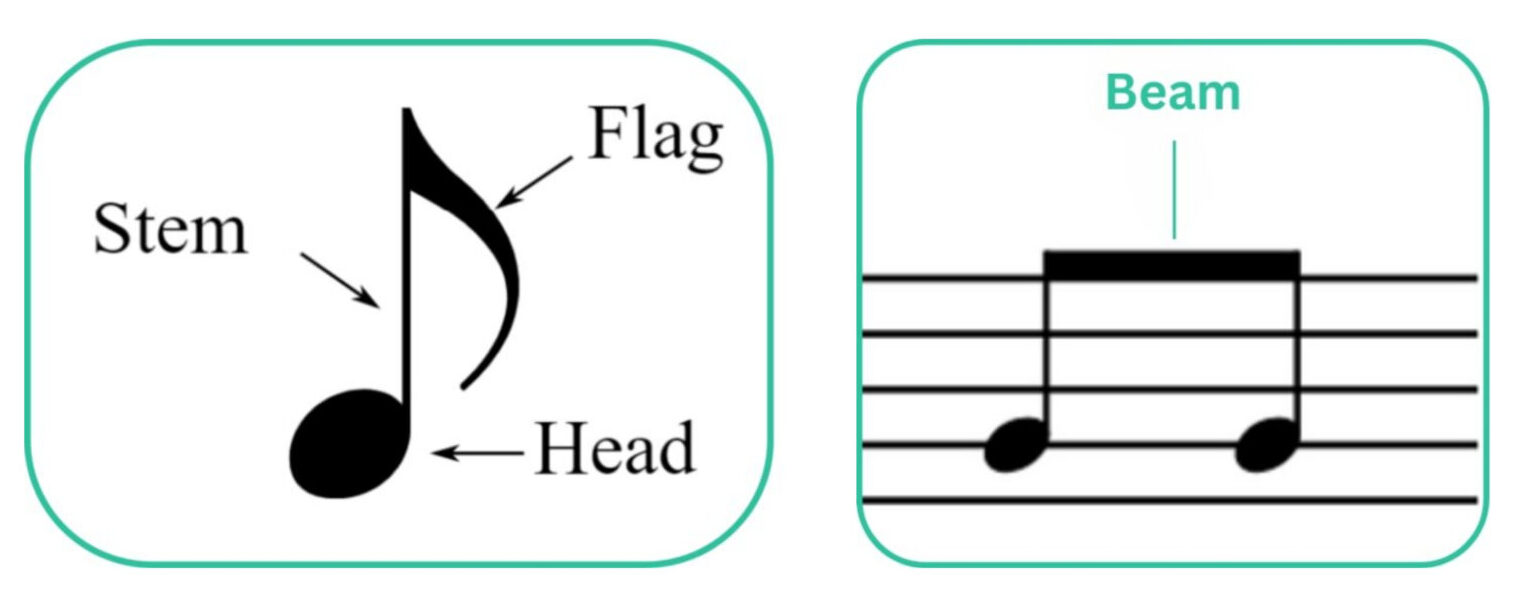
Musical note values tell you both where to play notes and how long to play them for. These values are dictated by making certain changes to the symbols we use to notate pitches through different flags, beams (combined consecutive flags) and note heads. This shows their relationship to a musical pulse or beat. Let’s start by breaking down the most common types of note value.
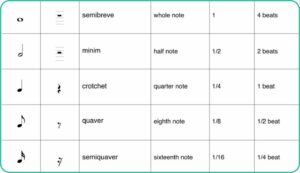
- Whole note/Semibreve: A whole note is represented by an open (hollow) note head without a stem. It typically lasts for four beats in common time (4/4), meaning you hold the note for the entire measure.
- Half note/Minim: A half note has an open note head and a stem. It lasts for two beats in common time, so you play it for half the duration of a whole note, filling half a measure.
- Quarter note/Crotchet: A quarter note has a closed (solid) note head and also has a stem. It lasts for one beat, meaning you can fit four quarter notes into one measure of common time.
- Eighth note/Quaver: An eighth note looks just like a crotchet but with the addition of a flag or beam. It lasts for half a beat.
- Sixteenth note/Semiquaver: A sixteenth note lasts for a quarter of a beat. This is shown by the addition of a second flag or beam.
These notes also have their equivalent in rests. Rests are notated silence in music and tell you when to leave space in music. Take a look at this handy table to help you memorise all these different values.
Ties, dotted notes and rests
A music tie is notated with a curved line linking two notes of the same pitch. A tie increases the length of a rhythmic value by combining the notes they connect.
With both dotted notes and rests dots are used to increase note values. A dot adds half of the note’s value to the original duration.
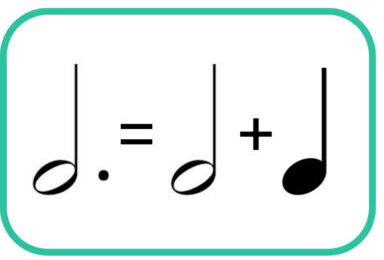
This dotted half note is equivalent to three beats. As a result of the added dot the half note, usually worth two beats, has half of this value added on again (one beat) to create the full duration of this dotted note. This maths applies the same way to both rests and notes of any value.
Time signatures and bars
Time signatures determine the meter of a piece, this dictates how many beats are in a bar and how you feel their emphasis. Time signatures are made up of two numbers to show how to count each bar:
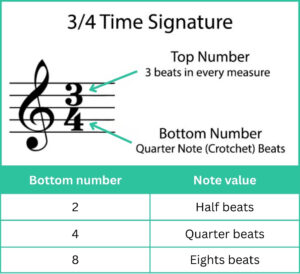
4/4 time means that you count to four in each bar (four quarter-note beats per measure):

Another example is 3/4 where you count to three in each bar (three quarter-note beats per measure):

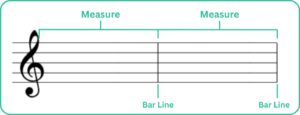
The vertical lines that are drawn through the staff split the music into measures/bars. Any combination of the previous note values can be used in a bar to create rhythms as long as the total corresponds to the correct duration of a bar. Each measure and division of a time signature in music is marked with bar lines. Bar lines help musicians divide pulse, rhythms and phrases into easy to understand chunks.
How to count in time?
Counting a pulse and understanding rhythmic placement are crucial aspects of playing piano. To get to grips with the rhythms we have explored begin by counting the beats of a bar keeping a steady pulse. This pulse will follow the tempo of the piece you are playing or learning.
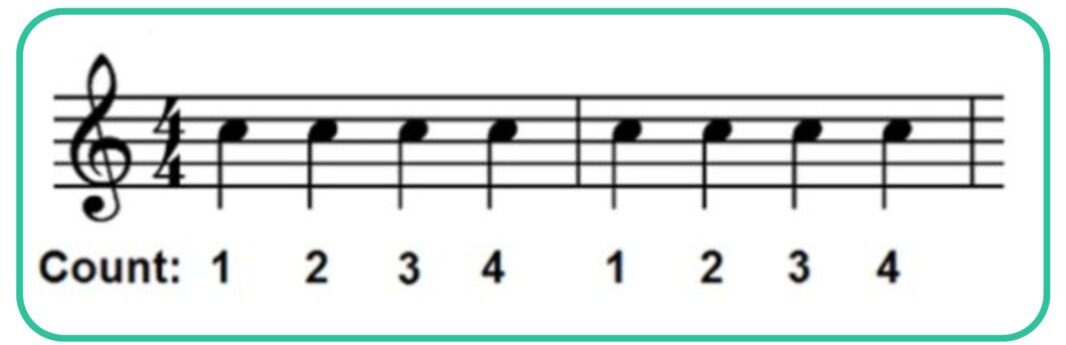
Not all musical rhythms are a regular pulse like this, some divide beats and make different rhythms around this steady pulse. This pulse is just the way musicians measure rhythms and keep them in time.
Musical rhythms can be worked out by sub dividing beats or rests in a bar and dividing them where necessary. To divide beats into eighth notes musicians count ‘1 and 2 and 3 and 4 and’, the ands being the half way between a beat.
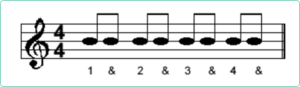
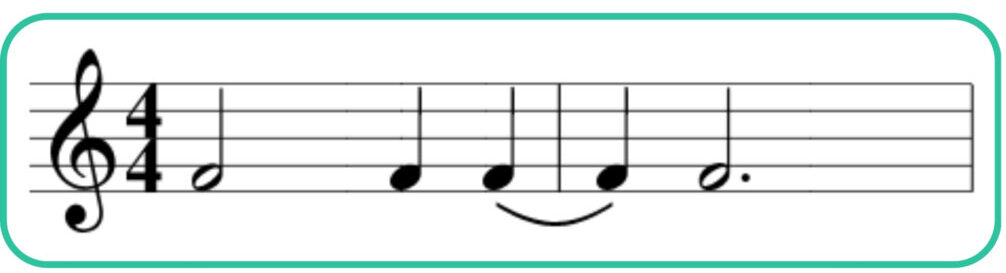
This diagram shows how different note values and rhythms correspond to the beats in a bar of 4/4.
As you get more comfortable with rhythm you can start dividing the bar more and playing more complex rhythms and divisions of a beat. Try using what you’ve learned to follow along with one of Skoove’s hand lessons and you’ll get to grips with rhythm and counting in no time.
Performance directions
Now we have the basics of pitch and rhythm it’s time to move on to how to add nuance to your playing.
Tempo
Tempo markings indicate how fast or slow a piece should be played. You may see a number and a beat duration telling you how many of this beat type occurs in a minute (BPM – beats per minute), or a written term. Most of these terms are in Italian and can be found on the online metronome.
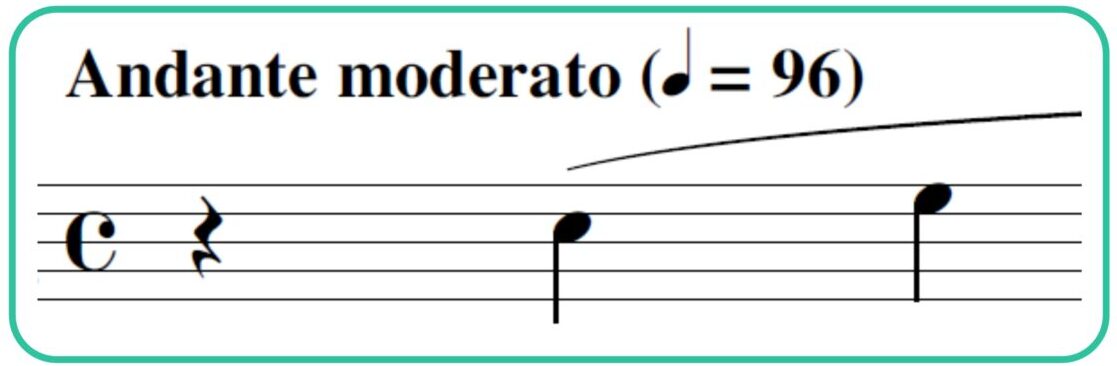
This shows that the tempo is “Andante moderato” aka. 96 crotchet beats per minute.
💡Check out these common examples of music tempo markings in this handy, free downloadable PDF chart!
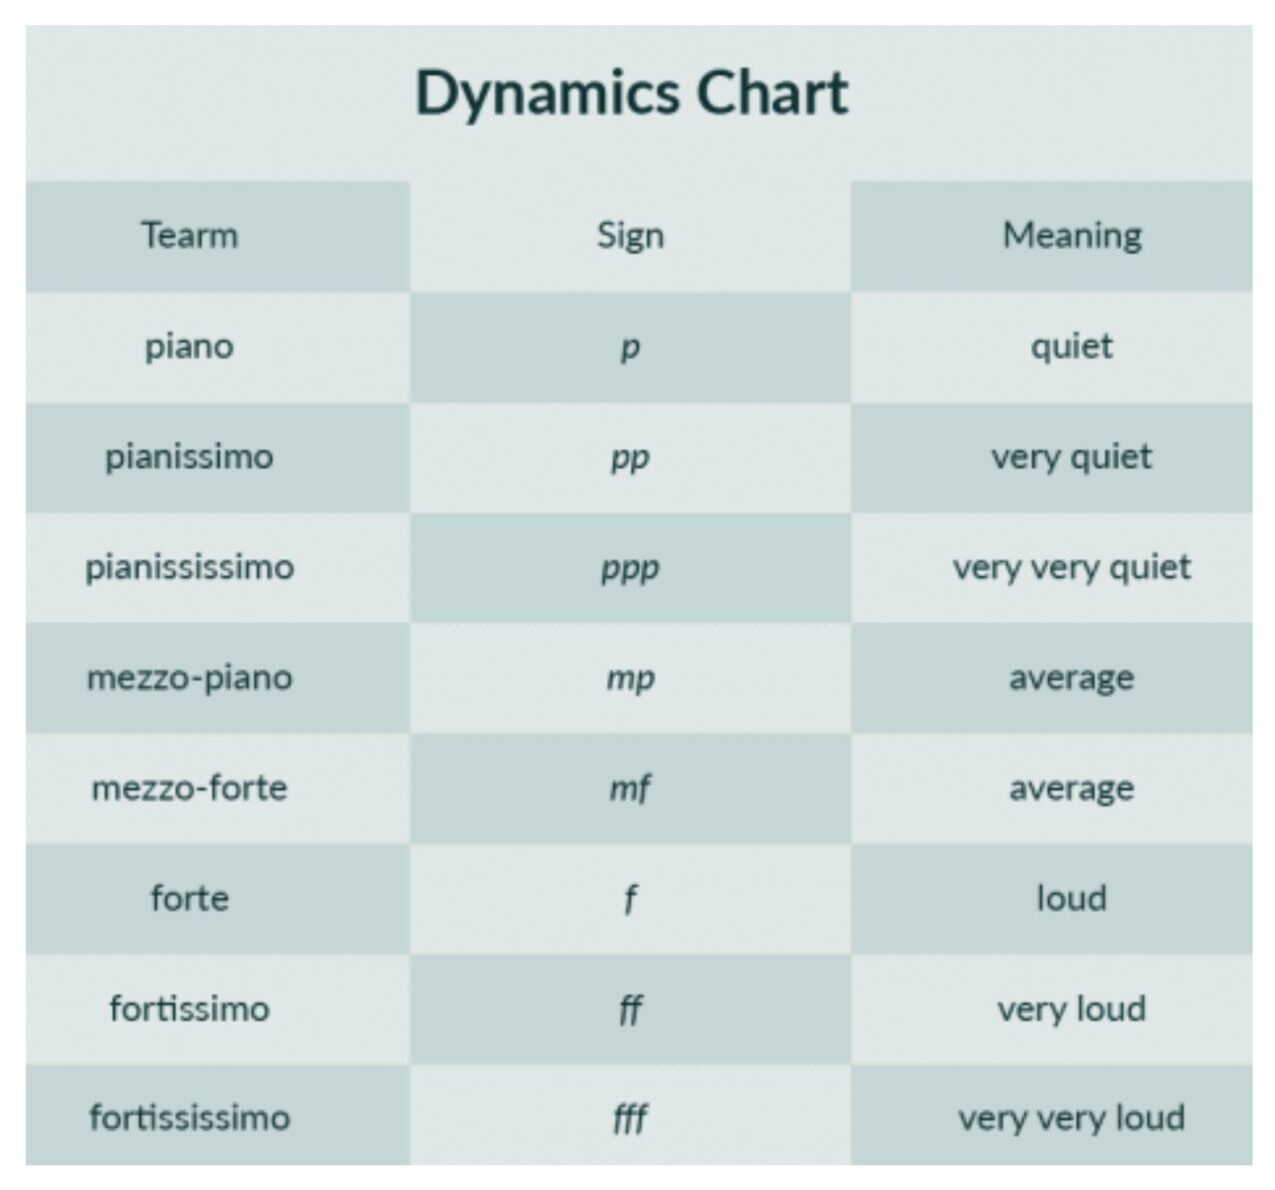
Dynamics
Dynamics appear throughout written music to tell you what volume to play at check out this chart of the common dynamic symbols you might come across when reading music.
Keep reading your favourite music with Skoove!
To explore more of your favorite songs and put what you’ve learned today into practice, try the Skoove piano app. As you have seen in this article Skoove offers a wide range of songs and lessons, including some excellent courses for improving piano technique. You can watch performances and slow down the speed as you learn, applying all the helpful tips discussed in this article. Happy note reading!
FAQ
A standard piano keyboard has 88 keys, but smaller keyboards often have 61, 76 or 49 keys.
Piano music notation is the way written music is conveyed for piano. It typically uses the grand staff, which combines the treble and bass clefs and rhythmic notation.
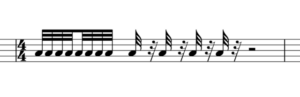
Thirty-second notes are notes with a duration of one eighth of a beat in a bar of 4/4 time. It is represented by a closed note head with a stem and three flags, or three beams when played in succession.
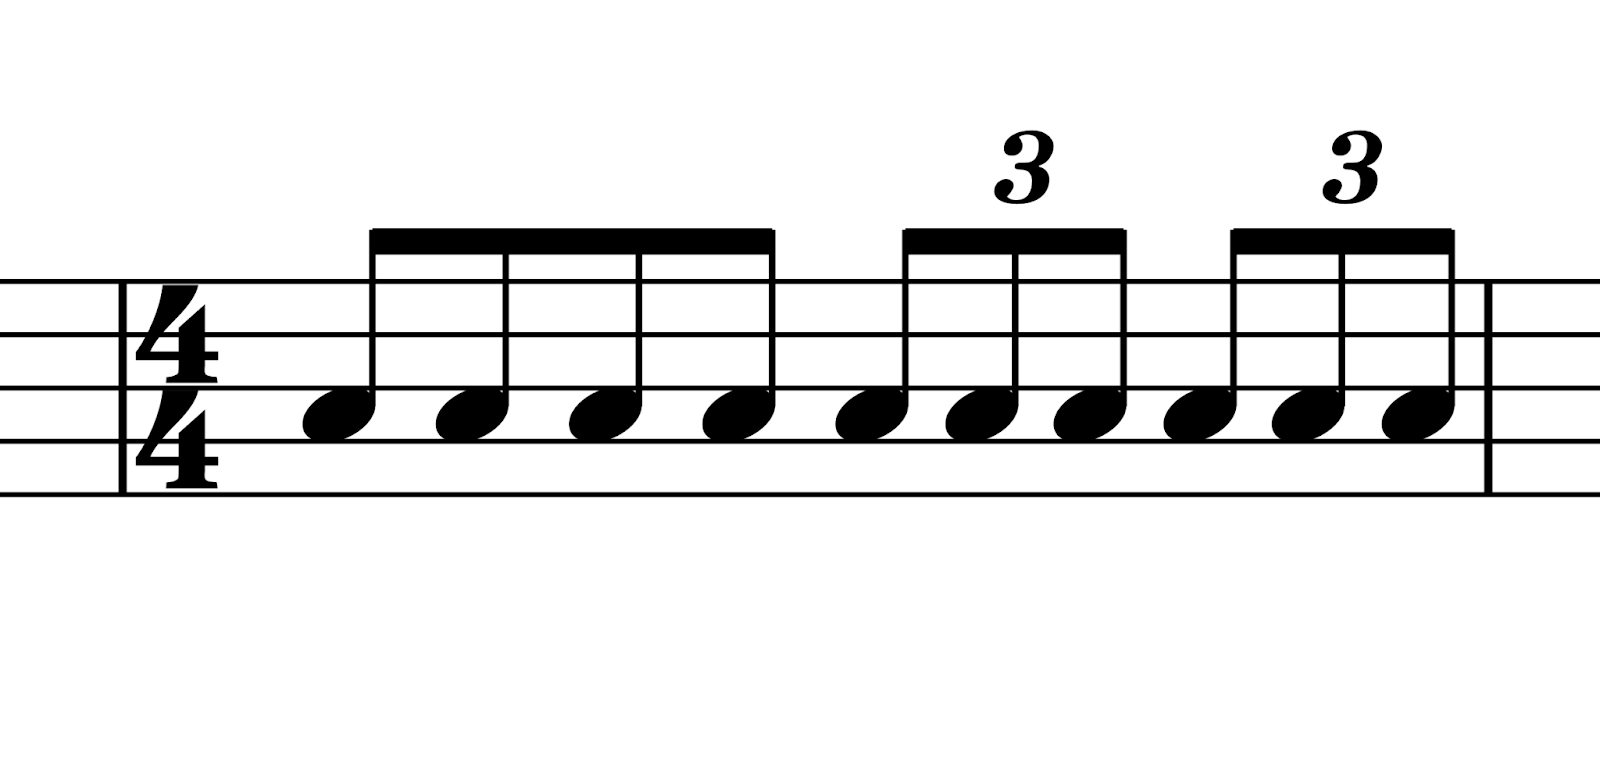
Triplets are groups of three notes played in the time of two notes of the same value. For example, a triplet of eighth notes is played in the time of two regular eighth notes, creating a compound time feel.
Grace notes, appoggiatura/acciaccatura, are notes played just before a main note, without receiving its full value or emphasis. They are used like passing notes to ornament or embellish a melody, often seen in classical music.

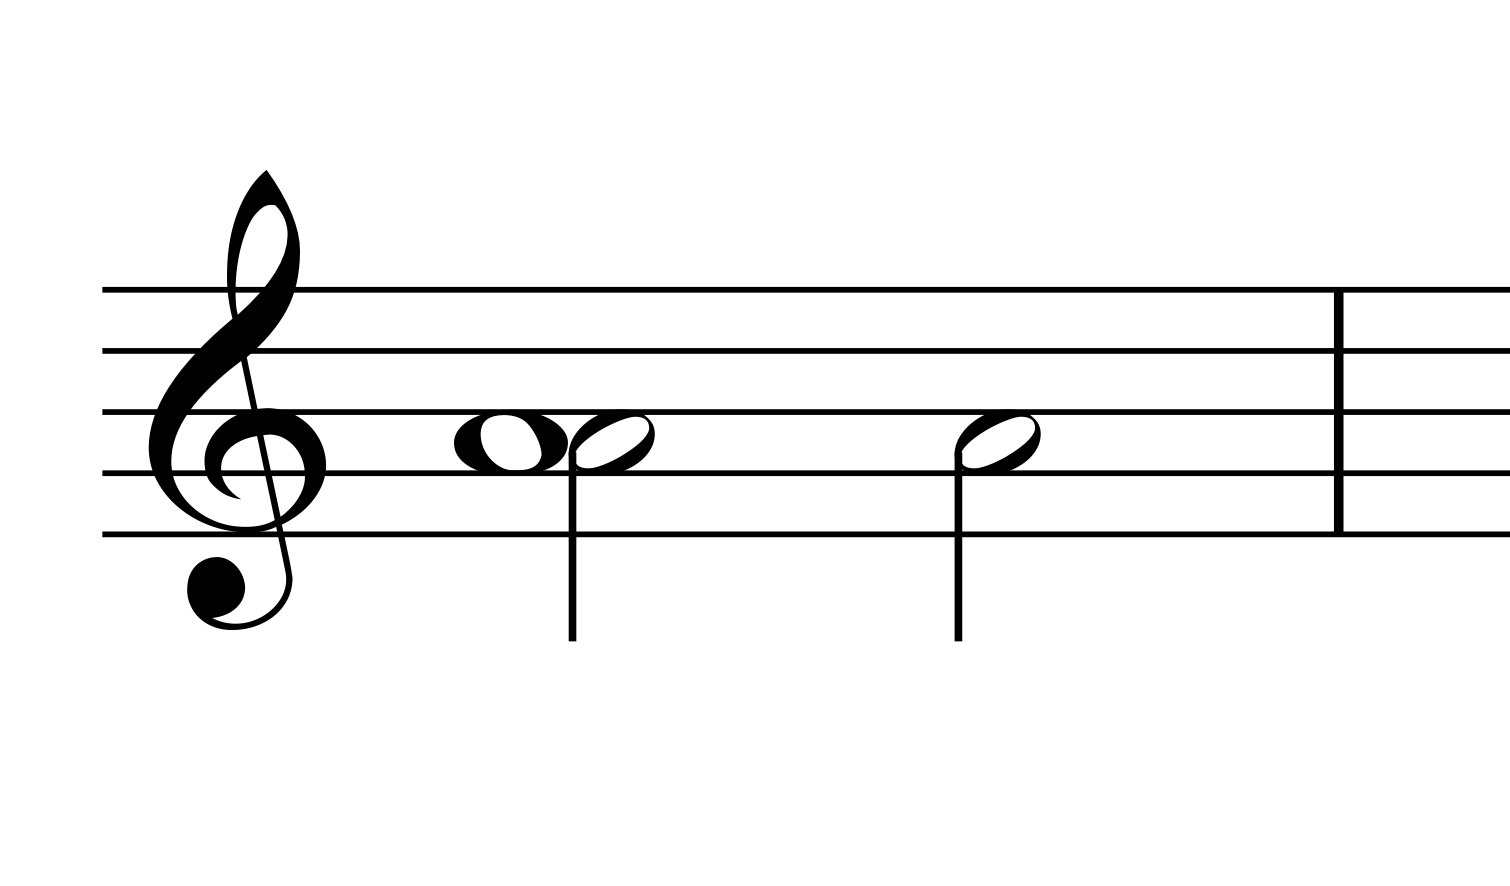
Unison notes refer to two or more notes of the same pitch played at the same time. This is common in ensemble playing when multiple instruments or voices perform the same melody.
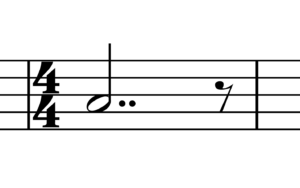
Double dotted notes function in the same way as dotted notes. However they add half of the value of the dot, not the whole note value. This example of a double dotted half note is worth three and a half beats.
Cue notes are smaller notes you will often see on individual ensemble parts. These notes give the player warning for entrances and relevant parts to make the player aware of timings and who they are playing phrases with.