Welcome to Skoove’s 21-Day Piano Challenge!
Designed for absolute piano beginners, this course offers a clear path to building essential piano skills in just three weeks. Through daily 30-minute practice sessions, you’ll learn fundamental techniques, play melodies and chords and explore basic music theory. With structured guidance and diverse song selections, you’ll gain the confidence to continue your piano journey and deepen your love for music.
Let’s get started!
Goals for the program
🔸Develop familiarity with the piano keyboard layout and basic hand positioning.
🔸Understand fundamental music theory concepts such as note names, rhythms, and basic terminology.
🔸Learn to play piano with simple melodies with both hands and separately.
🔸Develop proper posture, hand technique and finger dexterity.
🔸Build confidence in reading basic sheet music notation.
🔸Gain an understanding of basic chords and their formations.
🔸Cultivate a practice routine and habits for consistent improvement.
🔸Develop listening skills to recognize musical patterns and dynamics.
🔸Explore different musical styles and genres to expand musical appreciation.
🔸Lay down a solid foundation for further exploration and advancement in piano playing beyond the 3-week program.
- Fall in love with the music - Learn your favorite songs, at a level suitable for you.
- Enjoy interactive piano lessons - Explore courses covering music theory, technique chords & more.
- Get real-time feedback - Skoove's feedback tells you what went well and what needs practice.
🗓️ Week 1: Laying the foundation: how to learn piano
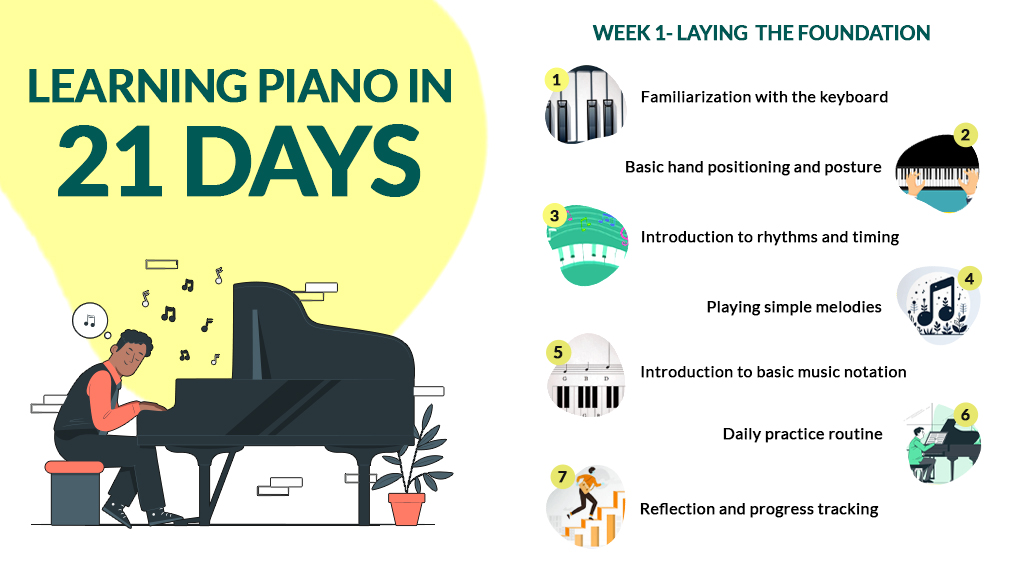
✅ 1st week goals
| Familiarization with the keyboard | - Learn the layout of the piano keyboard, including black and white keys. - Identify and memorize the names of the notes from C to G on the treble and bass clefs. |
| Basic hand positioning and posture | - Practice placing hands on the keyboard with correct finger positioning. - Focus on maintaining proper posture while sitting at the piano bench. |
| Introduction to rhythms and timing | - Understand the concept of beats, measures, and rhythm. - Practice tapping along with simple rhythms such as quarter notes, half notes, and whole notes. |
| Playing simple melodies | - Learn to play a simple melody using the right hand only, focusing on accuracy and finger control. - Practice playing short melodies with varying rhythms to develop coordination. |
| Introduction to basic music notation | - Learn to read and interpret basic sheet music notation, including note symbols and rhythmic values. - Practice identifying and playing notes on the staff corresponding to the keys on the piano. |
| Daily practice routine | - Establish a daily practice routine, aiming for 30 minutes of focused practice each day. - Set achievable practice goals for each session, focusing on specific skills and exercises incorporating Skoove lessons |
| Reflection and progress tracking | - Reflect on the progress made during the week, noting areas of improvement and challenges faced. - Keep a practice journal or log to track daily practice time and observations. |
🎹 Day 1: Keyboard familiarization
Welcome to day 1 of our 21 day piano for beginners course. Each day will feature a practice session with clear goals so you can effectively mark your progress.
Day 1 goals:
- Spend 10-15 minutes familiarizing yourself with the layout of the piano keyboard.
- Identify and memorize the names of the notes from C to G on both the treble and bass clefs.
- Look through the Beginner 1 lessons on the Skoove app.
- Practice saying the names of the notes as you locate them on the keyboard.
Welcome to the keyboard
Learning to play piano and any other instrument is a fantastic way to express yourself and to have fun!
While you may feel a little overwhelmed looking at your keyboard, the layout is really quite easy to understand. There is a repeating pattern of white keys and black keys on the piano. You will notice that there are alternating groups of two black keys and three black keys.
This alternating pattern is quite comfortable for our hands and will help provide us with useful landmarks as we progress along our journey.
Learning the notes from C to G
Just like in written language, we have an alphabet in music. Each letter of the musical alphabet corresponds to a pitch and to a key on the keyboard. There are 7 letters in the musical alphabet:
A B C D E F G
These seven letters repeat over and over. Depending on how many keys your piano has, the lowest one will be either A, C or E.
No matter what key is the lowest on your piano, we generally start learning the piano from a key called “Middle C.”
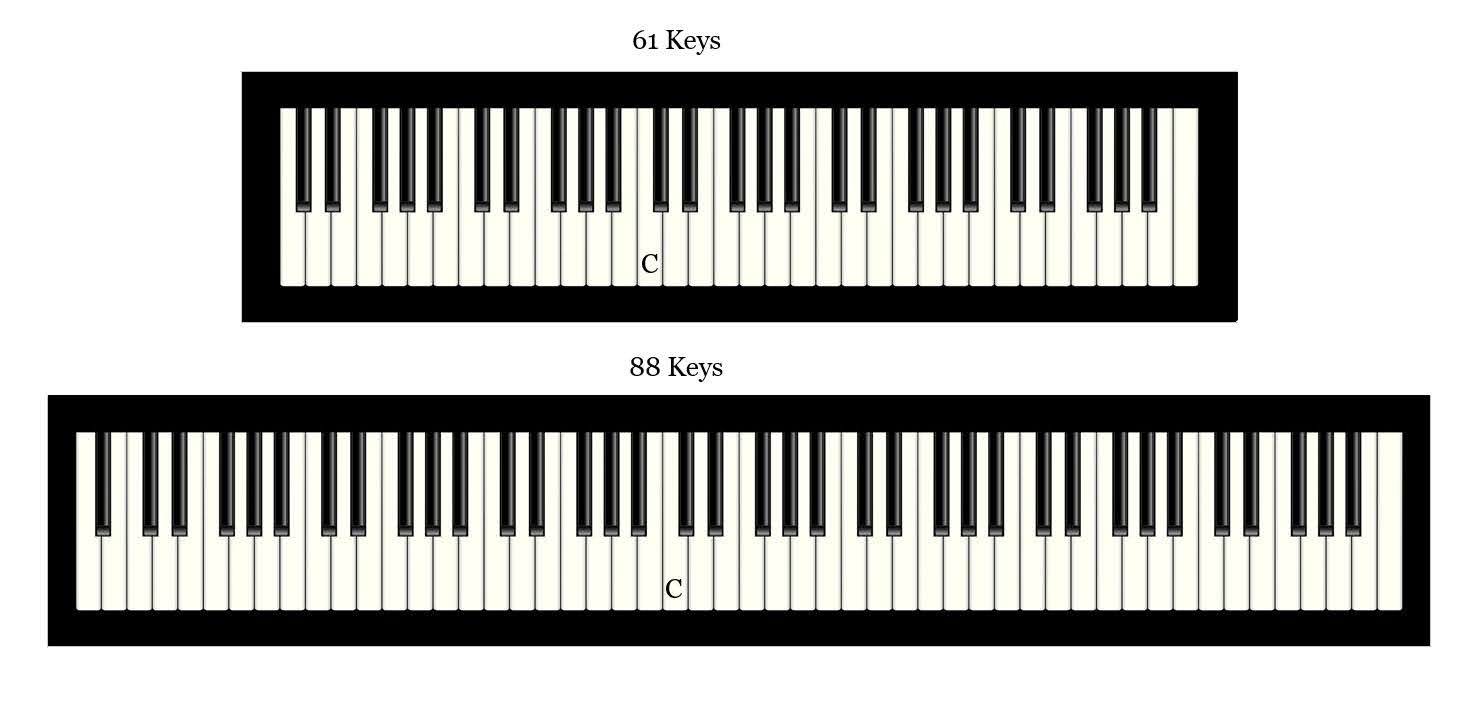

First, let’s begin with our right thumb on middle C. On both hands, the thumb is called the “first finger” or “finger number 1”. Let’s start pressing keys:
- First find middle C with the first finger of your right hand and push the key down.
Notice: Each white key ascending moves up one letter in the musical alphabet.
- Next play the next key D with your index finger, your 2nd finger.
- Find the next key E and play it with our middle finger or 3rd finger.
- The key after that F will be played with the ring finger, or 4th finger.
- Finally, we come to G which we will play with the pinky or 5th finger.
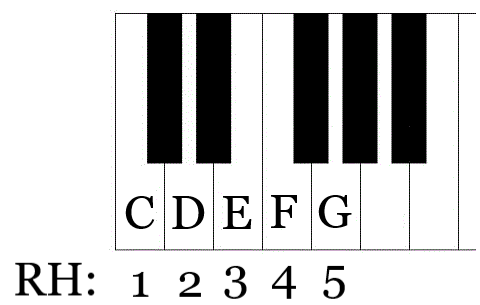

This is an exercise that we will play and develop as we go along. For now, just try and remember the names of the keys with your right hand.
Now, let’s try a similar exercise with the left hand, starting with the thumb (finger 1) on middle C. Moving to the left on the keyboard takes us backward through the musical alphabet. The key to the left of C is B, played with the index finger (finger 2).
The hands mirror each other: the index finger is always finger 2, the middle finger is finger 3, the ring finger is finger 4, and the pinky is finger 5.
Next, play A with finger 3, G with finger 4 and F with finger 5. Great job!
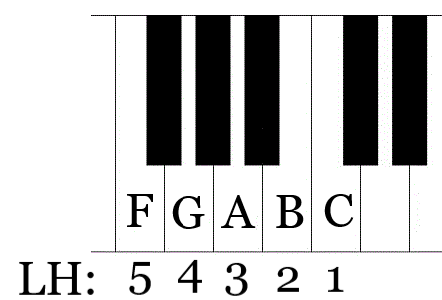

Now you can play five notes ascending from middle C with your right hand and 5 notes descending from middle C with your left hand. Work on memorizing the names of these notes as quickly as possible. You may find it advantageous to label the names of the notes on your piano.
Learning with Skoove
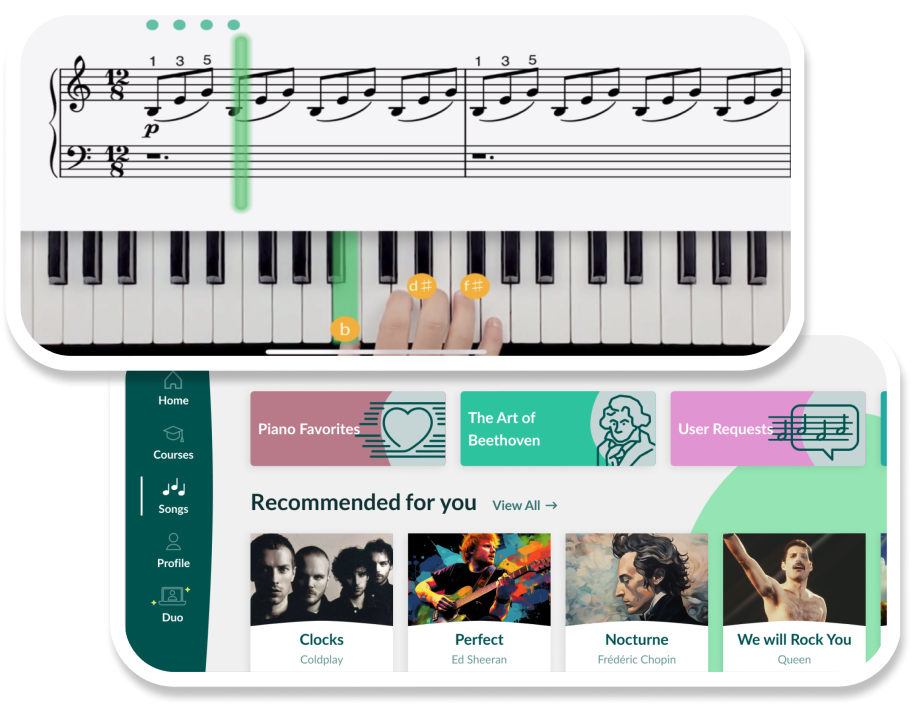
Now that we have spent some time playing around with the keyboard, let’s check out the Skoove app. We will be using lessons from the Skoove app as well as Skoove’s extensive collection of songs while we learn how to play piano.
So, download the app if you haven’t already and open it and start checking it out.

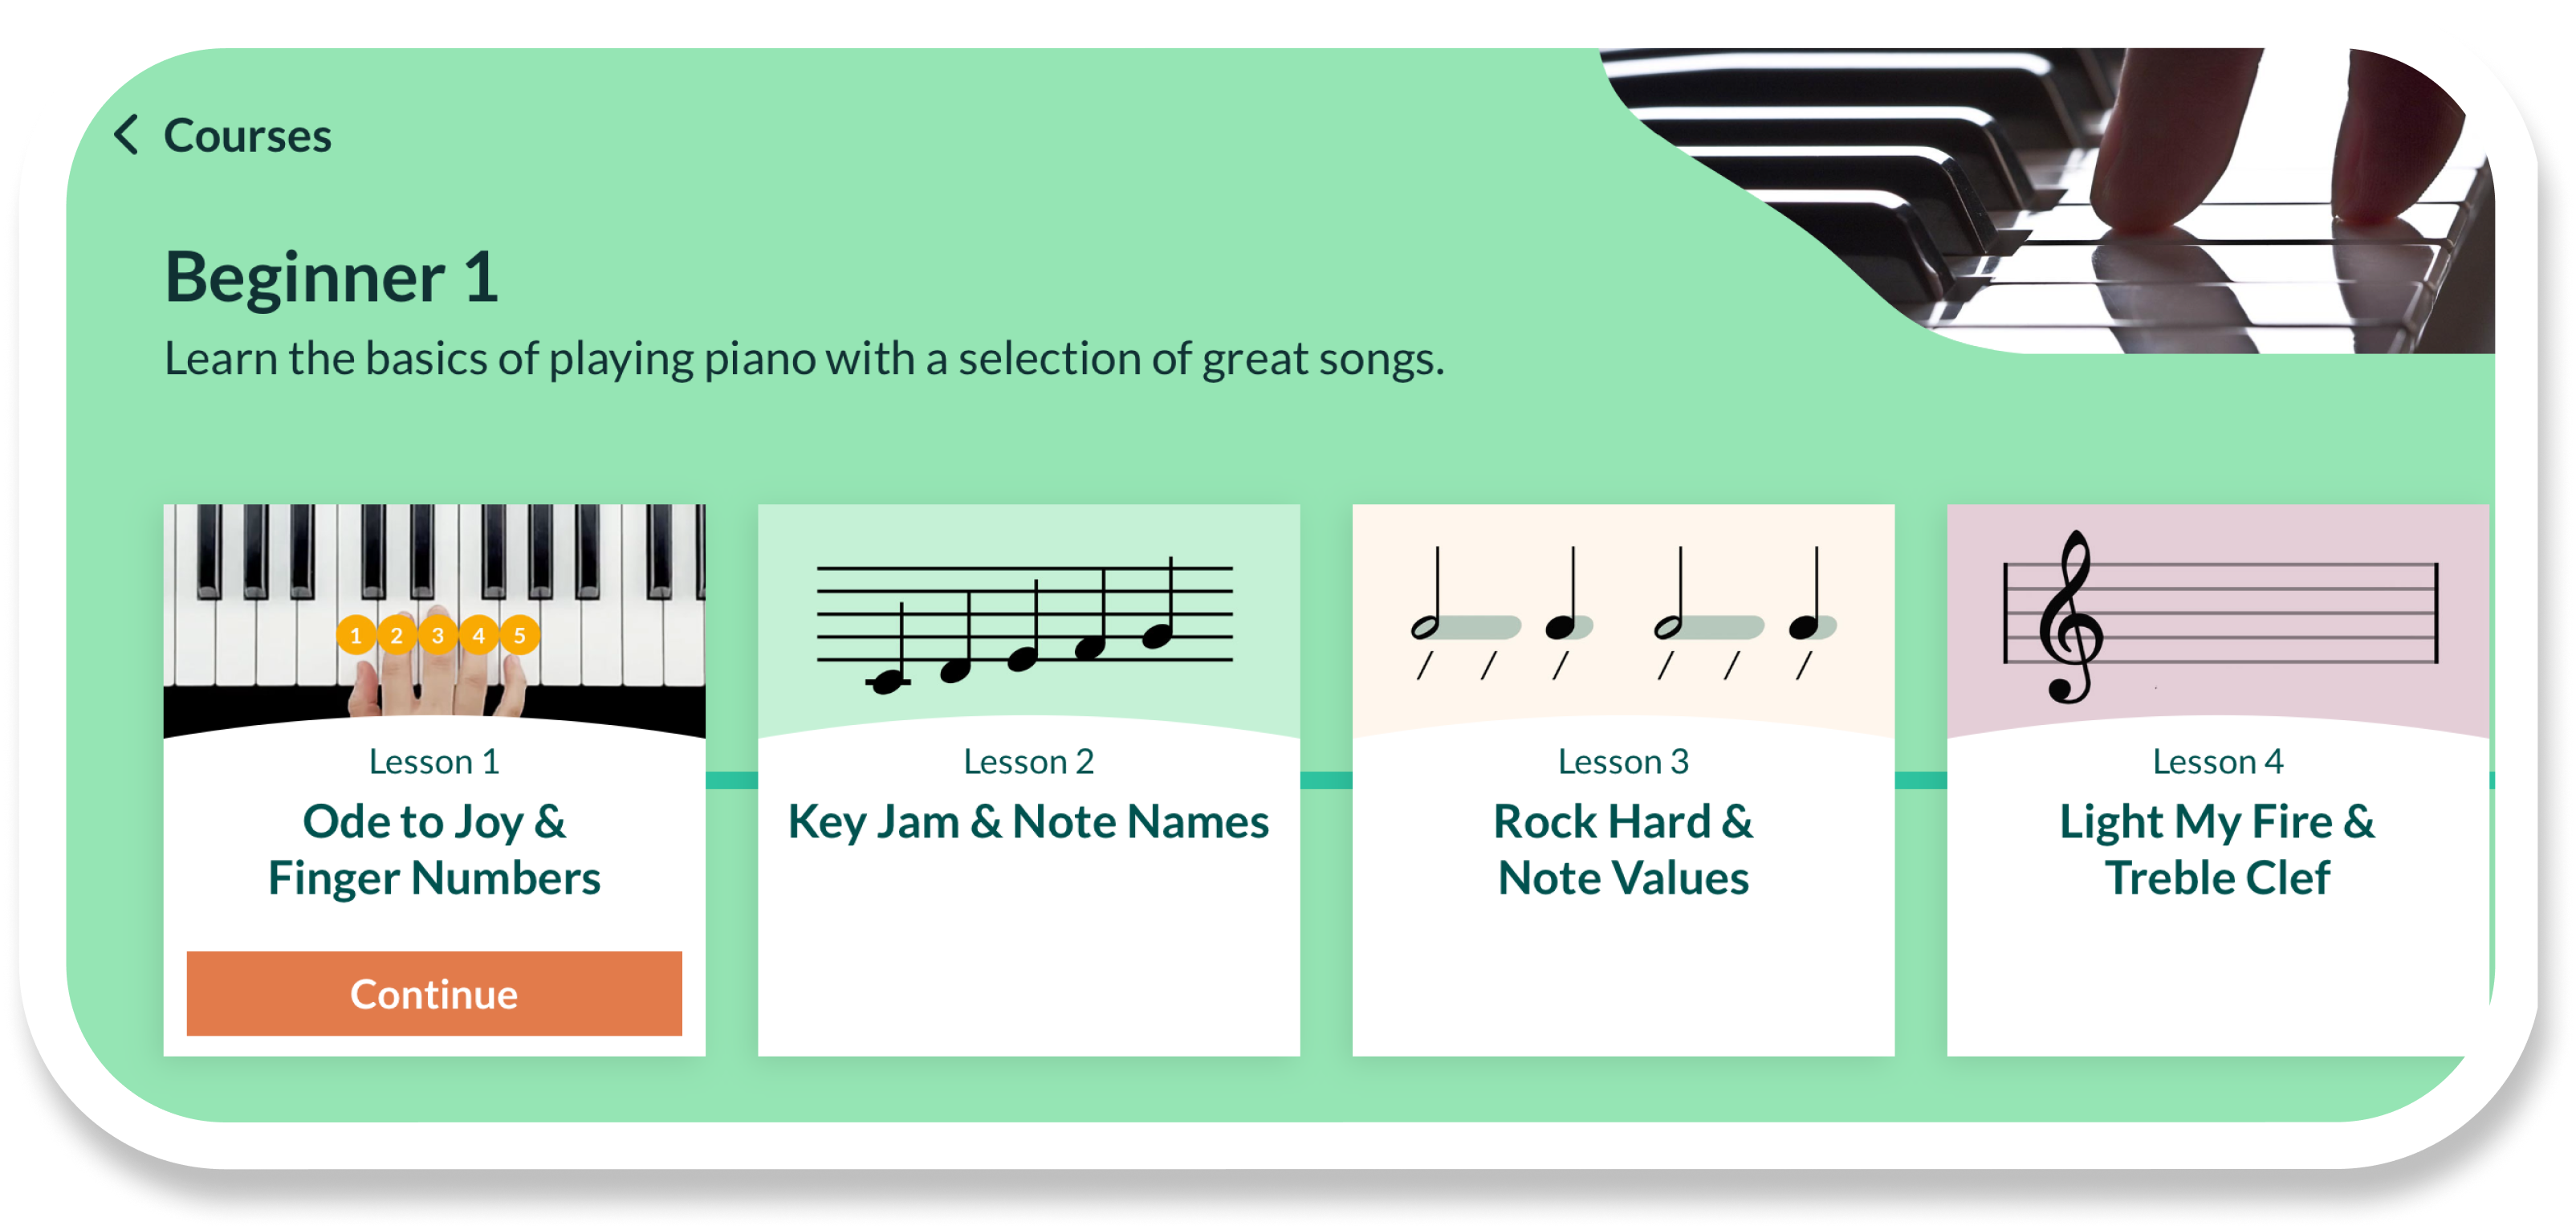
We will be incorporating material from the Beginner 1 course this week, so open that course and take a glance at the lesson topics and material. Each lesson features multiple steps. Open the first lesson, “Ode to Joy and Finger Numbers” for a review of the material we covered today.
Good work on day 1!
🎹 Day 2: Basic hand positioning and posture
You made it to day 2! Today we will focus on hand positioning and posture and dive into a lesson in the Skoove app working with note identification.
Day 2 goals:
- Review proper hand positioning on the keyboard, focusing on placing your thumbs on middle C.
- Spend time adjusting your posture at the piano bench to ensure proper alignment.
- Practice placing your hands on the keyboard in the correct position, with relaxed fingers and wrists.
- Work more with Beginner 1 course materials
Proper hand positioning and piano technique
Developing proper hand positioning and technique from the start is essential for comfort, relaxation, and long-term progress. It helps prevent pain in the hands, wrists, shoulders and your back.
Good hand positioning is simple and natural. Your hands should hover comfortably above the keys with slightly curved fingers, as if holding a tennis ball. Keep your wrists loose and relaxed, elbows bent and parallel to the keyboard and maintain a straight, relaxed posture while sitting at the piano.
Avoid holding tension in your arms, shoulders, neck or back. Relaxing might feel odd at first, but it’s key to playing comfortably and efficiently. With solid, relaxed technique, you’ll progress faster and feel better at the piano.
For further reference, you can read this piece on the Skoove blog aboutproper piano posture.

More note identification
Now, let’s practice some more note identification! We will use Lesson 2 from the Beginner 1 course in the Skoove app, Key Jam & Note Names to practice. You will also see in this lesson, some reminders about piano posture and relaxation as well.
In the next part of the lesson, we focus on starting from middle C with the first finger of your right hand and playing first up to F and then in the next part, up to G. After that, we have an exercise where we are asked to play all the notes in a pattern. Playing piano along with the Skoove app will help ensure you are doing the exercise correctly.
Next, we have the opportunity to play the exercise with a metronome and then with a backing track, which is always fun! Having some context like this to practice musical exercises helps them stick in our memory better and is always more enjoyable.
Finally, you can take some time to view the whole score. You will likely see some things on this score that you don’t understand, such as a series of lines, a weird curly “G” type symbol, and some dots and lines. Hopefully by now you understand the numbers above the notes are the finger numbers you should use and the letters underneath the notes are the pitch names. If that is still confusing for you, you might need to take a little extra time today to review the day 1 lesson and today’s material.
Good work on day 2! See you tomorrow!
🎹 Day 3: Introduction to rhythms and timing
Onwards to day 3! Today we will learn about a few different rhythm concepts. Music is full of rhythms and this is a crucial piece to the puzzle!
Day 3 goals:
- Learn basic rhythm concepts of half note, quarter notes
- Use lessons Rock Hard & Note Values and American Pie & Rest to reinforce understanding.
It’s all about the rhythm
Rhythm is the name of the game in music and understanding it is essential for piano beginners. Music is based around three concepts: rhythm, harmony and melody. You can think of melody as the lines that give a drawing its outline, harmony as the color that gives music its gradient and shade and rhythm as the life force that animates the other two, giving them life, movement and energy. Without rhythm, music could not exist.
In our music system, we use a few different tools to organize rhythm. We use different types of “notes” and “rests” to symbolize various lengths of sound and silence, we use a tool called “measures” to organize rhythms into digestible grouping and we use something called a “time signature” to organize the entire piece of music.
Let’s dive into Lesson 3 in our Beginner 1 course, Rock Hard & Note Value, to learn more about all these different tools of rhythm.

Rock hard & note values
First, check out the “Get to know the song” section to get a feel for the material we will be looking at. There are a few things you should notice here, mainly that there are some new looking note symbols we haven’t seen before. We will learn all about those as we go on.
Next, jump into the section called “Note lengths.” There you will learn that some notes are longer and some notes are shorter. You will then have the chance to practice some long notes in the next section on the key D with your second finger and after that, you will get to play the original example.
Moving on, we learn that the longer notes in this lesson are called “half notes” and the shorter notes are called “quarter notes.”
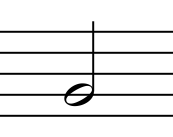
Half notes feature an open note head with a stem. Most of the time, half notes last for two counts or two beats. Musicians will use the words counts and beats interchangeably and they basically mean the same thing. That is, you would basically count 1 – 2 for a half note.
Quarter notes feature a closed note head with a stem. Most of the time, quarter notes last for one count or one beat.
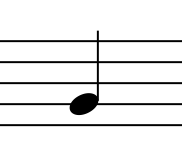
Moving on through the lesson, you have the chance to practice playing examples of quarter notes and half notes moving back and forth. If anything is unclear, take some time to review the lesson material once again.For further reference, check out this article from the Skoove blog abouthalf notes and quarter notes.
Silence is golden
Just as we use symbols like the quarter note and half note to mark sound in music, we also use symbols called “rests” to mark silence in music. And, just as there are quarter notes and half notes, so too are there analogous symbols called quarter rests and half rests.
Let’s check out Lesson 12 from the Beginner 1 course called “American Pie & Rests” to learn a little about the world of rests.
American Pie & Rests
If you open the lesson in your Skoove app and check out the song, you will see a bunch of things you already recognize. You see mostly a long string of quarter notes and half notes. You will also see a few new symbols that you probably don’t recognize. These are different types of rests.
Check out this handy table to compare all the note and rest lengths. Keep this with you throughout the course to remind yourself if you get stuck.
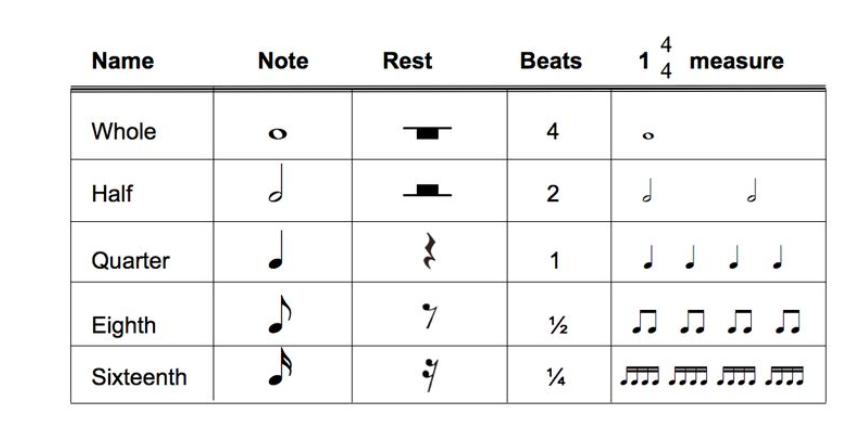
Next, you will learn by clapping the rests. Clapping helps us internalize the material outside of the piano. Then, as we have done in other lessons, you will be able to play the actual material in time, with a band and be able to view the full score.
For further reference on rests, you can read this article from Skoove on the differenttypes of rest symbols.
Great work on day 3! So far, you have learned your way through some basic notes, understand a few basic rhythms and rest and have even played a simple melody! Quite impressive for only three days with the piano!
Tomorrow we will turn our focus to learning a simple melody. So, take some time to brush up on what you have learned and we will see each other again tomorrow!
🎹 Day 4: Playing simple melodies
Day 4! Let’s check out some melodies! We will look at Lesson 7 from the Beginner 1 course today, “Oh, When the Saints 1 & Effective Practice.” Make sure you are up to speed on the last three days of material before diving into this!
Day 4 goals:
- Learn a simple melody using the right hand only, focusing on accuracy and finger control.
- Lesson 7: “Oh When the Saints 1 & Effective Practice”
- Check out Beginner Songs and find one to start learning
- Record yourself playing the melody to assess your progress and identify areas for improvement.
What is a melody?
As we learned in day 3, music is composed of three primary concepts: rhythm, harmony and melody. We learned that rhythm is the animating force of music. It gives music motion and life.
Melody is what gives music its shape and direction. A melody line is usually the part of a song that is sung. However, melodies can be instrumental or vocal. There are plenty of examples of exceptional instrumental melodies everywhere we look, especially in classical music but also in jazz, rock, pop and more.
You can read more aboutmelody in music on the Skoove blog.
Learning a simple melody
Open your Skoove app to Lesson 7 in Beginner 1: “Oh, When the Saints 1 & Effective Practice” This iconic melody combines many concepts from the past three days.
Start by reviewing the sheet music—you’ll recognize symbols like quarter notes, rests, half notes and a whole note. Next, follow the video tips for effective practice to improve your progress.
You’ll then learn the melody of “Oh, When the Saints” with your right hand. Don’t worry—we’ll focus on the left hand soon! Once you’ve learned the notes, play along with the Skoove app and backing track to get feedback and refine your performance.
Finally, check out the full score. Notice the finger numbers above the notes and that the note names are no longer provided.
Nice work on this melody. Review it as often as you like!
Check out the beginner songs
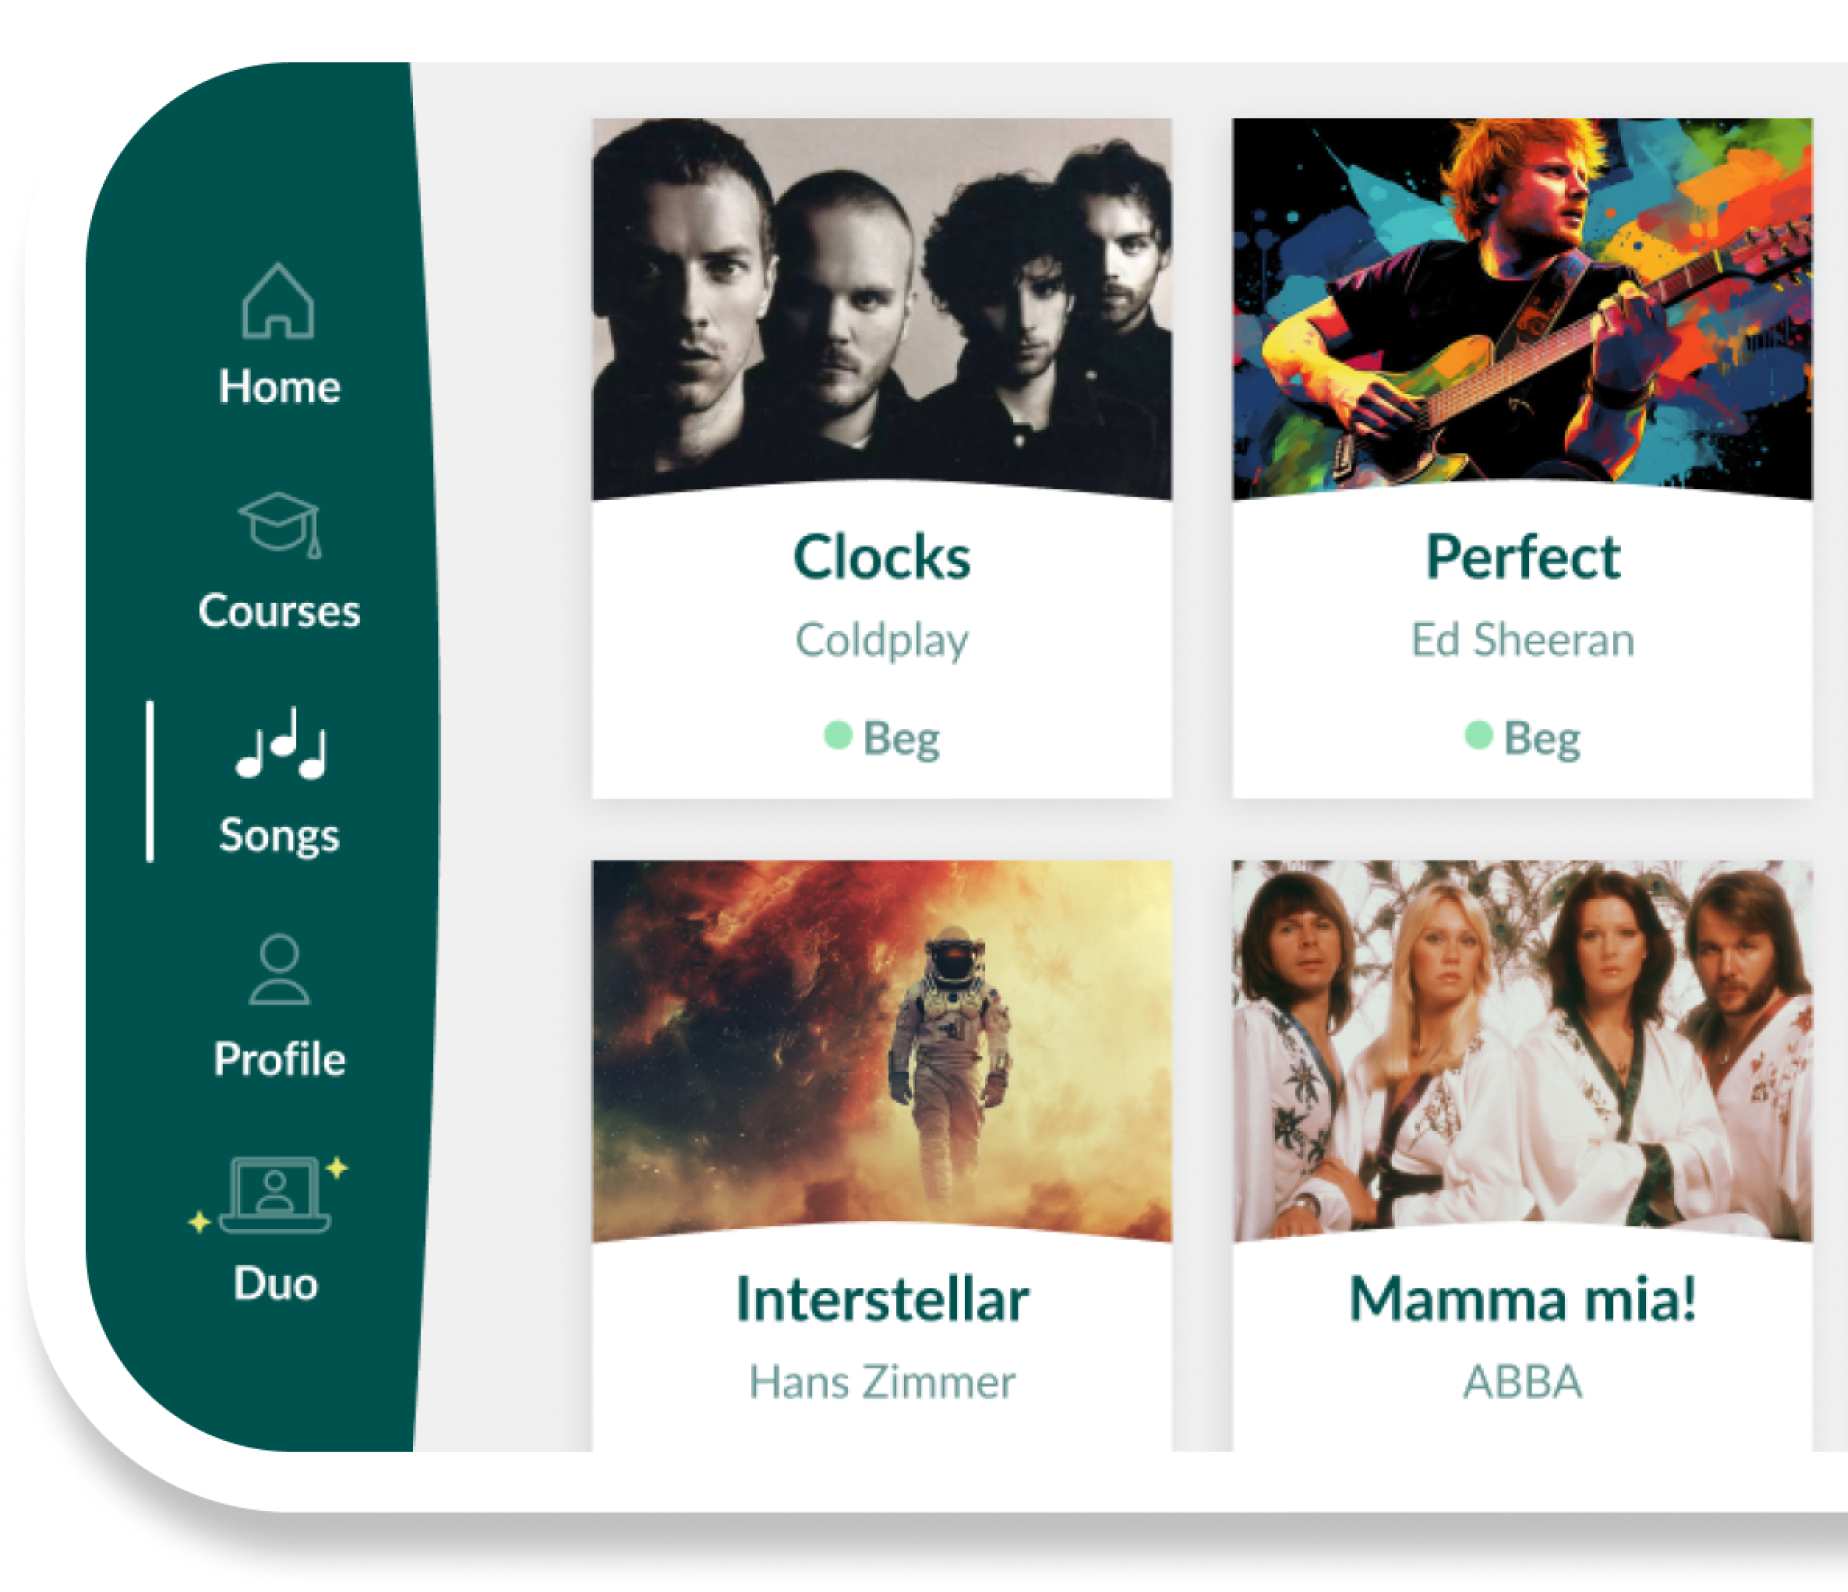
Now let’s take some time to explore the Beginner Songs section in the Skoove app. Skoove offers a wide catalog of songs across genres—popular, classical, folk, jazz, blues and rock—suitable for all levels.
Go to the “Songs” section on the left, select “Beginner” and browse through the available options. Think about which songs you’d like to learn, keeping in mind that some may include concepts you haven’t covered yet—another great reason to keep practicing!
Nice work on Day 4, tomorrow, we’ll dive into basic music notation. Enjoy the rest of your day and reflect on what you’ve learned so far.
🎹 Day 5: Introduction to basic music notation part 1
Day 5! Let’s learn how to read music! It is not as hard as you might think.
Day 5 goals:
- Learn basic music notation symbols such as the staff and the treble clef.
- Practice identifying notes on the staff and matching them to the corresponding keys on the piano.
- Light My Fire & Treble Clef lesson
Learning to read
Learning to read music is a fundamental skill that will allow you access deeper levels of music. As you develop your music reading skills, you will be able to identify particular aspects of written music and develop a strong overall understanding of the connections between notes, rhythms, pitches and instruments. It truly is a wonderful skill to practice.
Learning how to read music is not difficult. Let’s check out the basics today.
The staff
Music is notated on a collection of 5 lines and 4 spaces called “the staff.” The staff looks like this:

Treble clef
We use a few different tools to orient ourselves on the staff. The first tool we will learn is called the “treble clef.” The treble clef looks like this on the staff:

The treble clef is also known as ‘G’ clef because it tells us where the pitch G will be found on the staff. However, not just any G. The treble clef refers specifically to the G above middle C, the same G we have been practicing with our right hand, fifth finger.
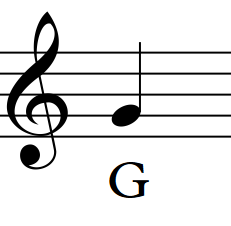
Once we understand where the note ‘G’ is on the staff, we can figure out all the rest. Basically, when we move higher on the staff, the pitches and note names also move higher. When we move lower on the staff, the pitches and note names move lower as well.
The lines and spaces of treble clef
We usually learn the notes in treble clef by breaking it down into the notes on the lines and the notes on the spaces. The notes on the lines of treble clef look like this:

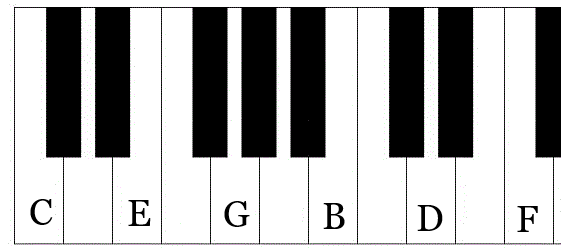
The notes on the spaces of treble clef look like this:

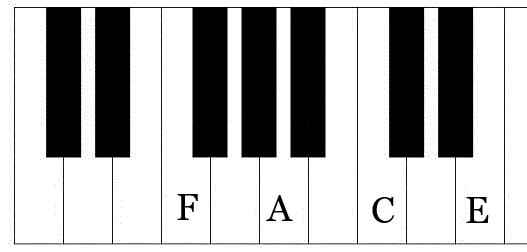
The phrases “FACE in the space” and “Every Good Boy Deserves Football” are helpful mnemonics for reading notes on the treble clef staff.
FACE in the space:
- The spaces between the lines of the treble staff spell the word FACE, from bottom to top.
Every Good Boy Deserves Football (E-G-B-D-F):
- This phrase helps you remember the notes on the lines of the treble staff, from bottom to top.
Together, these mnemonics make it easier to identify the notes on the treble clef staff quickly and accurately!
Not too hard, right? Let’s dive into a Skoove lesson to help boost our understanding.
Light My Fire & Treble Clef
Check out the material in Lesson 4, “Light My Fire & Treble Clef”, to review the notes on the treble clef and to practice some reading.
For more information about the treble clef, check out this post on Skoove’s blog.
Nice work today! We have covered quite a bit of ground so far in our piano journey. Make sure you take the time to review what we have covered and practice with the Skoove lessons to reinforce your understanding.
Tomorrow we will dive into another reading tool, the bass clef! See you then!

🎹 Day 6: Introduction to basic music notation part 2
Welcome to day 6! Today we are going to learn more about the basics of music notation. Yesterday we learned about a tool called the treble clef. Today, we will learn about a tool called the bass clef. When you are ready, dive in!
Day 6 goals:
- Learn the basics of reading notes in bass clef.
- Practice with the Skoove lesson “Good Vibrations & Bass Notes.”
- Review reading in treble clef.
Learning to read the bass clef
Yesterday, we learned that the treble clef marks the note G on the staff, specifically the G above middle C. From there, we figured out all the notes in the treble clef on the lines and spaces of the staff.
Today, we will learn about the bass clef. The bass clef looks like this:

The bass clef is also known as ‘F’ clef because the bass clef tells us where the note F is on the staff, specifically the F key below middle C, the same F key we found with our left hand fifth finger on our first day of practice. Bass clef notes are generally played with the left hand, while treble clef notes are generally played with the right hand.
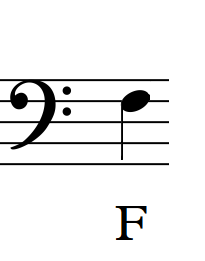
Just as we learned with the treble clef, as we move higher up on the staff, the pitches and note names also move higher, and as we move lower on the staff, the pitches and note names move lower.
The lines and spaces of bass clef
Now that we know where F is, we can follow a similar logic as we did yesterday and figure out the notes on the lines and spaces of the bass clef.
Here are the notes on the lines of bass clef:

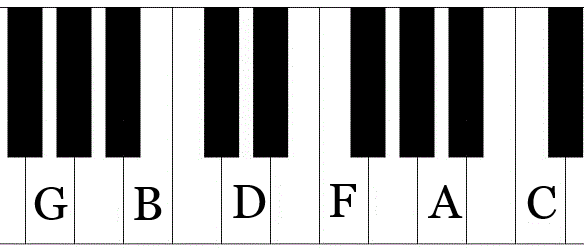
And here are the notes on the spaces of bass clef:

There are also helpful mnemonics for the bass clef.
All Cows Eat Grass (A-C-E-G):
- This helps you remember the notes in the spaces of the bass clef, from bottom to top:
Good Burritos Don’t Fall Apart (G-B-D-F-A):
- This phrase helps you remember the notes on the lines of the bass clef, from bottom to top:
These fun mnemonics make learning the bass clef notes simple and memorable!
Good vibrations & bass notes
Now let’s check out Lesson 14 “Good Vibrations & Bass Notes” is the Skoove app. In this lesson, we review the basics of the bass clef and have the opportunity to practice reading and playing notes in the bass clef with a band along with the classic tune from the Beach Boys.
Have fun and enjoy! Nice work on day 6!
🎹 Day 7: Reflect & review
Day 7! Congratulations on completing week 1! Let’s take some time to reflect on all we have learned.
Day 7 goals:
- Review material from the week.
- Reflect on your accomplishments and challenges from the week, noting areas where you’ve improved and areas where you’d like to focus more attention in the coming week and beyond.
- Take a look at our goals and objectives for the second week of our piano course.
❇️ Week 1 summary
We covered a lot of ground in the first seven days of our 21 day piano for beginners course. In this first week, you have learned:
- The layout of the piano keyboard.
- How to find the key “middle C.”
- The finger numbers.
- A few simple melodies in our lesson examples like “American Pie” and “Oh, When the Saints.”
- The basics of reading musical notation including the staff and reading notes in treble clef and bass clef.
- How to navigate through the Skoove app.
- One or two songs from the Beginner Song section of the Skoove app.
This is quite a bit of material! So, take the day to practice everything, reflect, and absorb all that you have learned.
Next week, we will focus on expanding upon and developing all the skills we worked on this week. Have a fun day and spend lots of time playing around, you’re a week into your journey of learning how to play piano, well done!
🗓️ Week 2: Expanding your skills
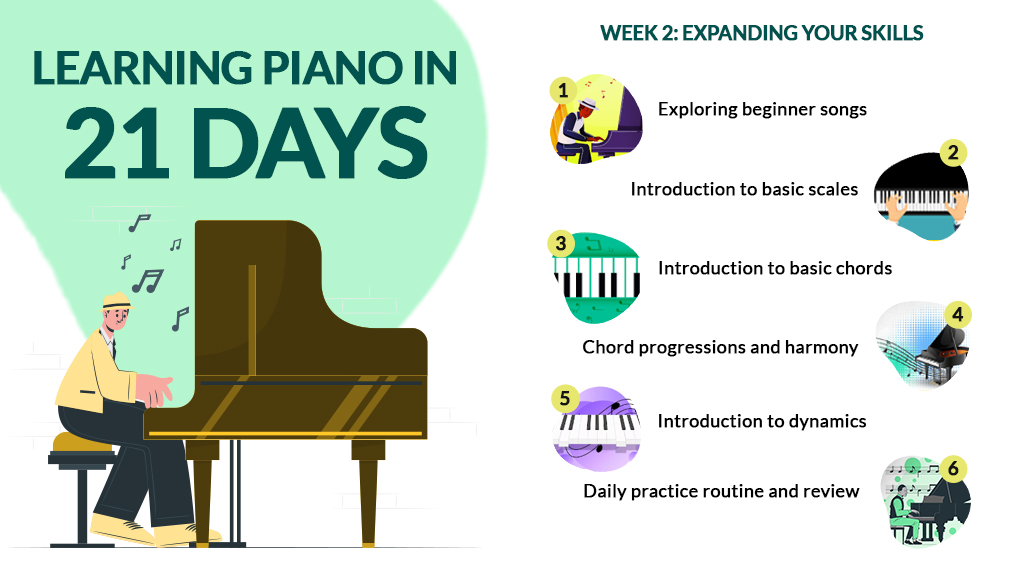
✅ 2nd week goals
Continue exploring Skoove’s beginner songs catalog Introduction to basic scales - Learn how to play the C major scale
- Learn the basic theory behind the major scaleIntroduction to basic chords - Learn basic major and minor chords (e.g., C major, D minor) and their fingerings.
- Practice playing chords in root position using both hands.Chord progressions and harmony - Explore simple chord progressions commonly used in music.
- Practice transitioning smoothly between different chords within a progression.Introduction to dynamics Understand the concept of dynamics in music.Experiment with playing simple melodies at different dynamic levels, focusing on expression. Daily practice routine and review - Explain how to build a consistent daily practice routine, incorporating exercises, scales, chords, and repertoire practice.
- Review previously learned material to reinforce concepts and improve retention.
🎹 Day 8: Exploring beginner songs on Skoove
This week, we will spend time reinforcing the concepts we explored last week, as well as adding some additional tips and tricks this week. We will try and focus on getting the most out of the Skoove app and hopefully you will start spending more time looking through and learning songs in the Beginner Songs catalog. Today’s practice will be all about that repertoire.
When you are ready, dive in!
Day 8 goals:
- Spend time exploring Skoove’s Beginner Songs catalog.
- Listen to previews of different songs to find ones that interest you.
- Choose one or two songs to focus on for the week based on your preferences and skill level.
- Familiarize yourself with the melody and chord progressions of the selected songs.
Beginner songs catalog
On day 3 last week, we opened up the Beginner Songs section of the Skoove app. You should have taken a glance at the choices and found something that looked fun and exciting to you. Hopefully, you were able to learn the song without too much difficulty.
Take a look again today and pick out a handful of songs that seem like fun to you. We recommend starting out with:
- Au Clair De La Lune – Claude Debussy
- Big Big World – Emilia
- London Bridge is Falling Down
All these songs can be found in the “Beginner 1” section of the Skoove app.

Quick review
Once you have checked out a few songs that seem like fun to you, take a moment to review all the material we covered last week. We covered quite a bit of ground, including the keyboard layout, the finger numbers, finding middle C, learning how to match the names of the keys with their pitches and some basics about reading rhythms, notes and rests. We also played two melodies, “American Pie” and “Oh, When the Saints.”
Nice work on day 8! We will take all that material a little bit further this week, so make sure you review the lessons if necessary.
🎹 Day 9: Introduction to the C major scale
On day 9, we will learn our first scale, the C major scale.
Day 9 goals:
- Learn how to play the C major scale on the piano.
- Study the fingering pattern for the C major scale and practice playing it ascending and descending.
- Understand the basic theory behind the major scale, including whole-step and half-step intervals.
- Practice the scale slowly and evenly, focusing on finger placement and hand coordination.
- Use “Playing Technique” Lesson 1 and Lesson 13 from the Skoove App.
- Practice your song choice from the Beginner Songs catalog.
What is a scale?
A scale is simply a group of notes that is arranged in a particular sequence. There are many different scales in music. One of the most common scales used is called the “major scale.” In fact, you already know part of the major scale.
Check out Lesson 1 from “Playing Technique” and we will see what we are talking about. In this lesson, you practice a 5 note scale ascending and descending from middle C. This is very much like the first exercise we practiced on day 1.
This 5 note scale is sometimes called a “penta scale” or, more commonly, “C Position.” As you progress through music, you will find that there are many names around the world for the same basic things.
The C major scale
The C major scale builds upon this 5 note “C Position” scale. It includes three additional notes and will require you to shift your hand slightly to play it. It is well within your grasp!
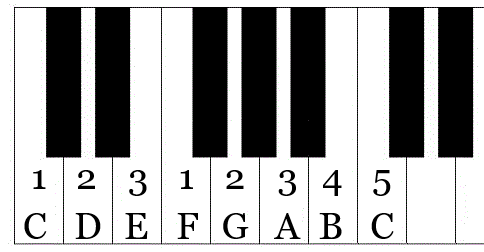
The notes of the C major scale are:
C D E F G A B C
The finger pattern in your right hand is:
1 2 3 1 2 3 4 5
To play the scale with your right hand, start with your thumb on C. Play C, D (2nd finger), E (3rd finger), then cross your thumb under to play F. Continue with G (2nd finger), A (3rd finger), B (4th finger), and C (5th finger). To descend, reverse the pattern.
Here is a diagram of the notes and finger numbers in your right hand:

Check out Lesson 13 in “Playing Technique” for a deep dive into practicing the C major scale. It is not necessary at this point to be able to play the scale together with both hands. You should also read this article on theC major scale from the Skoove blog to reinforce your understanding!
Day 9 was a good challenge, solid job!
🎹 Day 10: Introduction to basic chords
Today on day 10 we will explore an introduction to piano chords!
Day 10 goals:
- Learn basic major and minor chords, starting with C major and D minor.
- Study the fingerings for each chord and practice playing them in root position using both hands.
- Review Lesson 1 from Pop Piano.
- Practice your song choice from the Beginner Songs catalog.
What is a chord?
Chords are a foundational element of learning how to play piano and music making in general. You will hear chords everywhere. Chords and harmony give music its depth, shade and gradient.
At its most basic level, a chord happens anytime you push down two or more keys at the same time on the piano. If you push down C and E together, that can be a chord. If you push down F and G together, that can be a chord.
The most common type of chord is a three note chord called a “triad.” Think triangle or triceratops.
These triads can be major or minor depending on the relationships between the 1st note and the 3rd note. We will explore more of the theory of triads as we work further.
Playing a C major chord
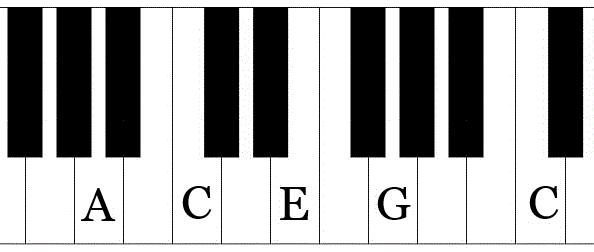
For now, let’s work on playing some basic chords. With your right hand, find middle C with your first finger. Next, press down E with your third finger. Finally, push down G with your fifth finger. Make sure you are holding down all three keys at the same time. The chord should look like this:
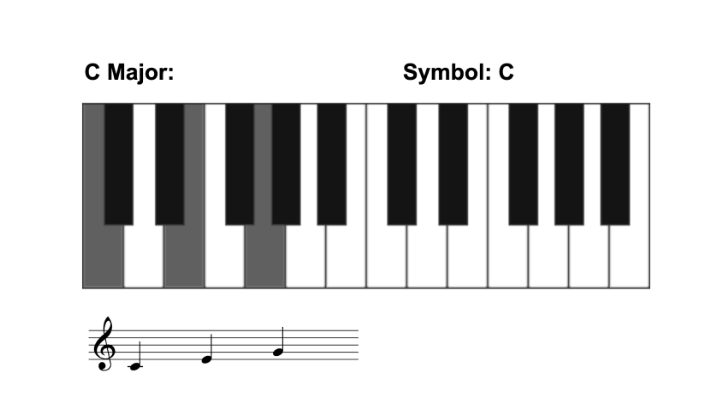
This is a C major triad. We call it a C major triad, or C major chord, because the “root” note is C and the “quality” of the chord is major. Chord quality does not refer to the substance or usefulness of the chord. Rather, we use the word quality as an umbrella term for things like “major”, “minor”, “diminished” or “augmented.”
If you count the number of keys from C to E (starting from C), you will find there are four keys. This interval (the distance between the notes) is called a “major third.” This is why we call this chord a major chord.
You can play this chord with your left hand as well. With your left hand, begin with your fifth finger on C, followed by your third finger on E and your first finger on G. Again, make sure you push down with all three fingers at the same time. Try playing the chord with both hands in as many places on the keyboard as you can find!
Playing a D minor chord
Now, let’s check out another chord, the D minor triad. This time, let’s start with the right hand first finger on D. Remember that D is the note in-between the group of two black keys. Then, play F with your third finger and finally A with your fifth finger. Remember to push down all three notes together. What a nice sound!
This triad is a “minor” triad because of the distance between D and F. Count the number of keys between D and F (including D). You should find there are three keys between D and F. This interval is called a “minor third.” Therefore, the minor triad is called a minor triad because it opens with a minor third and the major triad is called a major triad because it opens with a major third. Pretty neat, right?
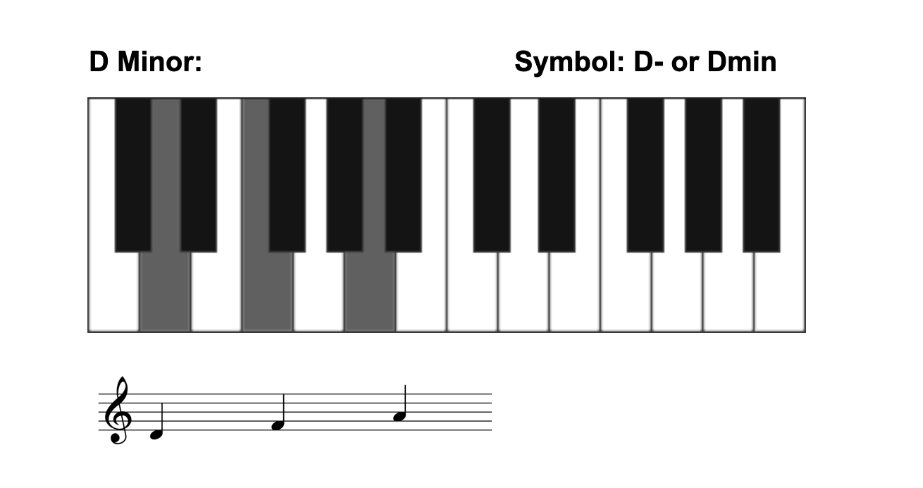
Now let’s check out the D minor chord with your left hand. We will use the same finger pattern here as we did with the left hand on the C major triad. Start with your fifth finger on D, followed by your third finger on F, and finally your first finger on A. Nice work!
Practice playing this chord as well with both hands in as many different positions as possible.
To learn more about chords, check out Lesson 1 from the Pop Piano course and review this article onpiano chords from the Skoove blog.
Fantastic job with day 10!
🎹 Day 11: Exploring chord progressions
Day 11 goals:
- Explore simple chord progressions commonly used in music.
- Practice playing chord progressions in various keys, focusing on smooth transitions between chords.
- Use lessons from the pop piano course in the Skoove app.
- Practice your song choice from the beginner songs catalog.
What is a chord progression?
Yesterday, we learned that chords happen anytime we play two or more notes together on the piano. We learned that the most common chord is called a triad and consists of three notes. Then, we learned two basic triads, a C major triad and a D minor triad.
Today, we will practice linking major and minor triads into chord progressions. A chord progression is basically a series of chords connected in a sequence. A chord progression can extend for any length of time, but in most pop music chord progressions last anywhere from four to sixteen measures.
There are many common chord progressions between songs. Many songs you know and love probably share the same, or at least very similar, chord progressions. These chord progressions evoke a familiar feeling, which is why they are used so frequently.
Let’s dive into some common chord progressions using the Pop Piano course in the Skoove app.
Paparazzi & Super Hit Chords
First, let’s open Lesson 5, “Paparazzi & Super Hit Chords.” The chords in this lesson include C major, G major, A minor, and F major – all chords on white keys.
This chord progression is common in many hit songs – hence the name of the lesson. In this lesson, you play all the chords with your right hand and bass notes on the root with your left hand. Each chord in the right hand is played with fingers 1, 3 and 5. The finger numbers are given in the lesson for the left hand.
If you are feeling like you want more work today, continue on with the next lesson, “Demon Chords & Pop Patterns” to see how you can vary the rhythm of this same chord progression. You can also check out this article onchord progressions from the Skoove blog for more learning.
Otherwise, great work on day 11 and we will see each other again tomorrow!
🎹 Day 12: Learning about flats and sharps
Day 12 goals:
- Learn about and understand flats.
- Use Beginner 1, Lesson 9, “The Blues & The Flat” and Intermediate 1, Lesson 1 “Moonlight Sonata & The Sharp.”
- Practice your song choice from the Beginner Songs catalog.
What are flats?
A flat is a term often used in music. So far, we have only learned about the white keys on the piano. Today, we will use some black keys. Generally, the black keys are notated one of two ways:
- With a symbol called a “flat”
- Or, with a symbol called a “sharp”
The symbol for flat looks like this:
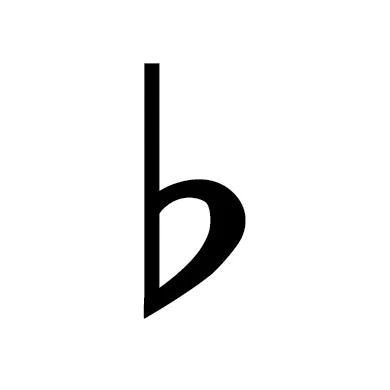
This symbol means the note is flat and you need to play it one key lower than normal. For example, if you have a G♭ written, that means you will play the black key directly to the left of G.
You can see that note here:

Practice finding the following flats:
- D♭
- A♭
- E♭
- B♭
The Blues & The Flat
Now let’s open up the Skoove lesson “The Blues & The Flat” from the Beginner 1 course to reinforce our understanding of flats. In this lesson, we learn more about flats and practice a little improvisation of the blues form. Have fun!
What is sharp?
A sharp is basically the opposite of a flat. Instead of lowering the note by one key, we raise the note by one key. The symbol for sharp looks like this:
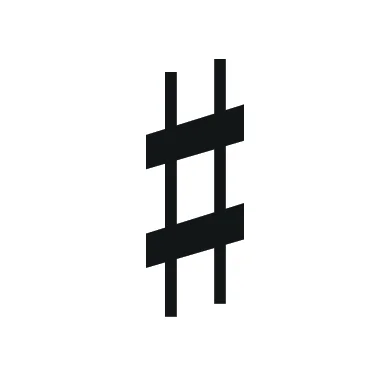
So, if you see a note written like G♯ or F♯, then you play the black key directly to the right of G or F. G♯ is here on the piano:
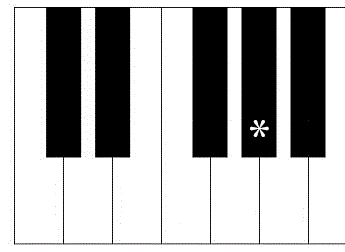
And F♯ is found here on the piano:
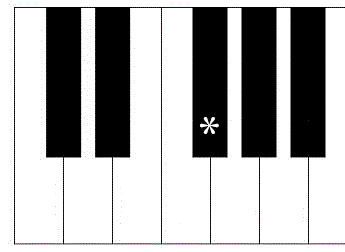
Do you notice that F♯ and G♭ are the same key? We call keys like these enharmonic equivalents.
Practice finding the following sharps on your keyboard:
- A♯
- C♯
- D♯
Moonlight Sonata and The Sharp
Now, let’s check out the lesson “Moonlight Sonata and The Sharp” from the Intermediate 1 course in the Skoove app. This piece might be a little beyond your ability level right now, but the lesson teaches us about the sharp and it will be useful for you to check out either way. Take your time with this lesson – and nice practicing on day 12!
🎹 Day 13: Introduction to dynamics
Day 13 goals:
- Understand the concept of dynamics in music, including terms such as forte (loud) and piano (soft).
- Experiment with playing simple melodies at different dynamic levels, focusing on expression and emotion.
- Practice crescendos and decrescendos within melodies to understand how dynamics can enhance musical phrasing.
- Use the lesson “Jaws & Articulation” from Skoove Beginner 1 course.
- Practice your song choice from the Beginner Songs catalog.
What are dynamics?
Today, we will introduce the concept of dynamics and articulation, understanding these concepts is another essential for piano beginners. Basically, when you hear musicians talk about dynamics, what they are referring to is the volume and expression of music. Musicians have many different terms for volume, expression and articulation to make the music as lively and multi-dimensional as possible.
Dynamics add interest and depth to your playing and learning how to read and understand dynamic markings on music will enhance your understanding of piano music.
Basic dynamic markings are often written in Italian, however you will see more advanced dynamic markings written in many different languages as well. Let’s dive into some specifics.
- Basic dynamic markings
The most basic dynamic markings are those for volume. We use a few different terms and symbols for volume. Check out the table below:
| Word | Symbol | Meaning |
| pianissimo | pp | Very quiet, very soft |
| piano | p | Quiet, soft |
| Mezzo piano | mp | Medium quiet |
| Mezzo forte | mf | Medium loud |
| forte | f | Loud, strong |
| fortissimo | ff | Very loud, very strong |
We also have terms and symbols for increasing or decreasing volume.
To increase volume, we use a symbol called crescendo. It looks like this:

To decrease volume, we use a symbol called diminuendo. It looks like this:

You may sometimes see crescendo abbreviated as cresc. You may also sometimes see a diminuendo called decrescendo.

Jaws & Articulation
Now let’s put these dynamics into practice with Lesson 13 from the Beginner 1 course, “Jaws & Articulation.” This lesson is based on the theme from John William’s score for “Jaws” and you have probably heard it. It is a great theme to practice dynamics, since it just moves between two notes in a very iconic and well-known pattern.
Open up the lesson and check out the piece. You will see that we start at pianissimo and gradually move up through the dynamics until we have a quick crescendo from mezzo forte up to fortissimo. Practice along with the piece and read more aboutdynamic markings in music on the Skoove blog. That’s all for today! Great job with day 13!
🎹 Day 14: Reflect & review
Day 14! Congratulations on completing week 2! Let’s take some time to reflect on all we have learned.
Day 14 goals:
- Review material from the week.
- Reflect on your accomplishments and challenges from the week, noting areas where you’ve improved and areas where you’d like to focus more attention in the coming week and beyond.
- Take a look at our goals and objectives for the third and final week of our piano beginners course.
❇️ Week 2 summary
Nice work with week 2! We made a lot of progress this week. Let’s summarize everything we covered so you can review it all today.
- You should have picked one or two songs from the Beginner Songs catalog in the Skoove app to practice.
- We learned the C major scale.
- We learned about chords and chord progressions.
- We learned about dynamic markings.
- We learned about flats and sharps and how to read them in music.
- We had a great time playing the piano!
You are now two weeks into your journey of learning how to play piano, congratulations! Take all the time you need today and review this material and your choice of song or songs. Starting tomorrow, we begin the third and final week of our piano for beginners course as we set ourselves up for future success with the piano!
🗓️ Week 3: Trying it all together
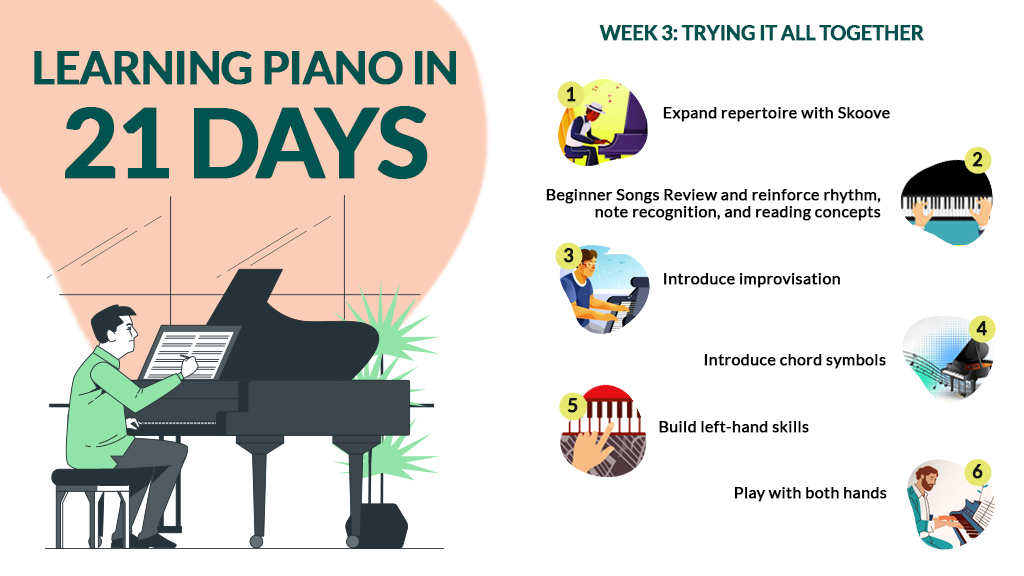
✅ 3rd week goals
| Expand repertoire with Skoove Beginner Songs catalog. |
| Review and reinforce rhythm, note recognition, and reading concepts. |
| Introduce improvisation with Lesson 11 “Twin Peaks & Improvisation.” |
| Introduce chord symbols with Pop Piano Lesson 2 “Heal the World II & Chord Symbols.” |
| Build left-hand skills in preparation for playing with both hands. Use Lesson 4 from Beginner 2 course, “Musette & Left Hand Training.” |
| Play with both hands and practice Lesson 15 from Beginner 1 Course, “Sonata & Both Hands.” |
🎹 Day 15: Time for more songs!
Welcome to day 15, the first day of the third week of our 21 day piano course. Hopefully you feel fully reviewed and caught up on the information we have explored so far! If you still need a little time, no worries. All we will do today is spend some time reviewing previous concepts and looking through the Skoove Beginner Songs catalog for some new material to check out this week. We suggest trying one of our favorites, Tchaikovsky’s “Swan Lake”.
Day 15 goals:
- Review and practice all course material, especially any parts you are confused about.
- Look through Skoove Beginner Songs catalog and find one or two songs you would like to work on this week.
- Practice your chosen song or songs from the Beginner Songs catalog.
Have fun and nice job with day 15!
🎹 Day 16: Reading practice
On day 16, we will spend some time practicing our reading skills and reinforce all the knowledge we have gained over the last two weeks.
Day 16 goals:
- Practice sight reading in the right and left hands using Lessons 13 and 14 from the Beginner 2 course.
- Practice your chosen song or songs from the Beginner Songs catalog.
Sight reading is fun!
Reading music is not terribly difficult to learn but it is a skill that needs to practiced with some regularity, otherwise you will lose speed. Let’s practice some reading with Lessons 13 and 14 from the Beginner 2 course, “Mrs. Robinson & Sight Reading.” This lesson uses the iconic Simon & Garfunkel song, “Mrs. Robinson.”
Here are our top tips for improving your piano sight-reading:
- Practice regularly: Consistency is key. Set aside time each day to sight-read new pieces.
- Start slow: Begin at a slow tempo to focus on accuracy before increasing speed.
- Look ahead: Train your eyes to look a few notes ahead, not just at the current one you’re playing.
- Don’t stop: If you make a mistake, keep going. Focus on the flow, not perfection.
- Analyze the music first: Before playing, scan the piece for key signatures, time signatures and difficult sections.
- Keep a steady rhythm: Focus on maintaining a consistent tempo, even if it’s slow.
Mrs. Robinson & Sight Reading
n this lesson, we practice some sight reading skills using the notes from C to G. First, get to know the song. There are some skips and leaps in the melody, so be ready for that. Additionally, there is one tricky note at the end.
Of course, once you practice it more than a few times, it is no longer sight reading, it is just practice. So, your next task will be to check out Lesson 14, “Mrs. Robinson & Sight Reading II”, where we practice some sight reading with the left hand.
Nice work today! For more review, check out this article onremembering piano notes from the Skoove blog.

🎹 Day 17: Time for improvisation!
On day 17, we will try out some simple improvisation as well as continue practicing on the chosen song or songs for this week.
Day 17 goals:
- Understand what improvisation is.
- Explore Lesson 11 from the Beginner 1 course, “Twin Peaks & Improvisation.”
- Continue practicing on your chosen song or songs from the Skoove catalog.
What is improvisation?
Improvisation is one of the most fun things you can do with music. Basically, improvisation at the piano means you will spontaneously create music. You can spontaneously create music based on a chord progression, rhythmic idea, scale or arpeggio pattern, or you can just play whatever comes to mind. There are no hard and fast rules with improvisation.
Some particular genres of music have more rigid rules regarding improvisation, but we are not going to focus on those here. For now, stretch out, let go, and let your fingers travel where they will.
Spend about 5 or 10 minutes just playing freely on the piano. Experiment with dynamics, with high or low notes, and with speed (fast or slow). Let your imagination guide you, don’t worry about what it sounds like, and don’t judge yourself. Let it flow.
Twin Peaks & Improvisation
Now, let’s check out Lesson 11, “Twin Peaks & Improvisation” from the Beginner 1 Course. In this course, we get a quick review of the finger numbers and the “twin keys.” Then, we practice improvising with the band using these keys. Have fun and enjoy the themes!
🎹 Day 18: Chord symbols
On day 18, we will deepen our understanding of chords and learn about chord symbols!
Day 18 goals:
- Learn to read and understand chord symbols.
- Practice with Pop Piano Lesson 2 “Heal the World II & Chord Symbols.”
- Practice your chosen repertoire from the Skoove Beginner Songs catalog.
What are chord symbols?
On day 10, we learned the basics of chords. We learned that a chord happens any time you play two or more notes together. The most common type of chord is called a triad and a triad has three notes.
However, you may be wondering how we notate chords? The simplest way for us to notate chords is with “chord symbols.” Chord symbols give us all the basic information we need to know which type of chord to play and when to play it.
Here is an example of a chord symbol for C major:
C
Yep. That’s it. For a major chord, all we need to write is the root name.
Here is an example of chord symbol for D minor:
D min
For a minor chord, all we write is the root name + min. Easy, right?
Heal the World II & Chord Symbols
Now, let’s check out some chord symbols in action. Open Lesson 2 in the Pop Piano course, “Heal the World II & Chord Symbols.”
In the first part of this lesson, you will see some chords notated on the staff and with chord symbols. The chords are C major, D minor and E minor. You will play the triads in your right hand and play the root notes one octave lower in your left hand. First, you will practice hands separately, then together, then in time with the band.
By the end, you will be able to read some basic chord symbols!
Make sure to spend time reviewing your chosen songs as well – and great job with day 18!
🎹 Day 19: Preparing the left hand to play both hands together
On day 19, we will shift our focus to prepare to play with both hands together. On day 2, we will work on Lesson 5 from the Beginner 2 course, “Musette & Both Hand Training.” In preparation for that, we will spend today working on Lesson 4 from the Beginner 2 course, “Musette & Left Hand Training.”
Day 19 goals:
- Prepare yourself for playing piano with both hands.
- Practice Lesson 4 from the Beginner 2 course, “Musette & Left Hand Training.”
- Work on your chosen Skoove songs.
Playing piano with both hands
The time has come! We will start trying to play the piano with both hands. Over the last 19 days, you have made a lot of progress in your piano journey! In fact, you have already played some material with both hands.
However, our next goal will be to learn how to play piano with both hands independently. Of course, this is something that pianists practice their entire lives, so don’t stress about it. We will take it slow.
Musette & Left Hand Training
Let’s begin with Lesson 4 from the Beginner 2 course, “Musette & Left Hand Training.” This piece is based in the C position and features a mix of whole notes, half notes, and quarter notes. By now, you should have little difficulty mastering this material. Pay special attention to the finger numbers!
Tomorrow, we will begin working towards our culminating lesson! So, review your skills and sleep well!
🎹 Day 20: Playing with both hands
On day 20, we will practice playing piano with both hands!
Day 20 goals:
- Practice “Musette” with both hands.
- Use Lesson 5 from the Beginner 2 course, “Musette & Both Hand Training.”
- Don’t forget about your chosen repertoire from the Skoove Beginner Songs catalog.
Two hand time
Wow! Nice work! Over the last 20 days you have made some great progress on the piano. Now, today we will try and culminate all the practice from the last 20 days into playing independently with both hands. We will use Lesson 5 from the Beginner 2 course, “Musette & Both Hand Training” for this, so when you are ready, get to your piano and let’s get to work!
Musette & both hand training
First, let’s get to know the song “Musette.” We can hear some independent melodic playing in the right hand with left hand bass notes and two examples of descending scale patterns where both hands play the same notes together. Shouldn’t be too hard, right?
Next, hit the finger gym. Here we first listen to the piece in sections and play together slowly.
After that, learn the keys with both hands at your own pace. A short lesson on the metronome follows. The metronome helps you practice with steady time so you don’t accidentally speed up or slow down without you knowing. It is really helpful!
Next, we play the piece in time with both hands with the recorded track and video. After that, we play with the band!
Remember our top tips for playing piano with both hands:
- Start Slowly: Begin by playing each hand separately, then combine them at a slow tempo to build coordination.
- Focus on Hand Position: Keep both hands relaxed, with curved fingers and wrists slightly above the keys for better control.
- Use Proper Finger Numbers: Follow the correct finger numbering for both hands to maintain consistency and ease of movement.
- Keep Hands Close to the Keys: Avoid stretching too far—your hands should stay close to the keyboard for fluid and comfortable movement.
- Practice Hands Together Gradually: Don’t rush. Start with simple exercises and gradually increase difficulty as your coordination improves.
Don’t worry if some of these steps take you a little longer. The piece is relatively short, but should give you a good challenge. If you completed the lesson quickly, then great for you! But, remember that developing your skills on the piano is a lifelong journey and everyone moves at their own pace. Don’t compare yourself to anyone else – only to yourself yesterday – and you will be happy and have fun!
Fantastic practice on day 20!
🎹 Day 21: Three weeks completed!
On day 21, we will take some time to review everything we have covered. You will have time to brush up on yesterday’s material and we will make some time to plan for future piano practice!
Day 21 goals:
- Review material and concepts from the entire course.
- Set Future Learning Goals
- Reflect on your progress over the past three weeks and identify areas for continued growth.
- Set specific, achievable goals for further improvement in your piano playing journey.
- Continue practicing “Musette” with both hands as well as your chosen Skoove pieces.
Let’s review
Over the past three weeks, you’ve made incredible progress throughout this piano for beginners course! You’ve mastered the keyboard layout, learned finger numbers and are now able to play independently with both hands. You’ve gained a solid foundation in reading music, understood the basics of the C major scale and explored triads and chord symbols. Additionally, you’ve learned several melodies and completed 2–4 songs from the Skoove Beginner Song catalog, learning the fundamentals of how to play piano. Well done!
Conclusion
Take some time to reflect on your progress and plan your next steps. We highly encourage you to continue working with Skoove if you’ve enjoyed this how to play piano course. If you’re seeking more personalized guidance, consider working withpiano teachers who can further refine your skills and checking out our list of related articles below, perfect for piano beginners.
So, we wish you the best of luck with your piano journey and thanks for all the great work you have put in over the last 21 days!
Suggested beginner songs
| # | Name |
|---|---|
| 1 | Always Look On the Bright Side |
| 2 | American Pie |
| 3 | Another One Bites the Dust |
| 4 | Bach’s Minuet |
| 5 | Candle In The Wind |
| 6 | Dancing Queen |
| 7 | Demons |
| 8 | Fur Elise |
| 9 | Gymnopedie 1 |
| 10 | Hallelujah |
| 11 | House of the Rising Sun |
| 12 | Jaws |
| 13 | Korobeiniki |
| 14 | Lean On Me |
| 15 | Mamma Mia |
| 16 | Moonlight Sonata |
| 17 | Ode to Joy |
| 18 | Our House |
| 19 | Purple Rain |
| 20 | Sound of Silence |
| 21 | Stand By Me |
| 22 | The Bare Necessities |
| 23 | Viva La Vida |
| 24 | We Will Rock You |
| 25 | Winter |
Suggested useful articles
🗓️ Week 1
| Piano notes |
| Quarter, half, and whole notes |
| Treble clef notes |
| Bass clef notes |
| Melody in music |
🗓️ Week 2
| Piano chords |
| Piano scales |
| Dynamic markings in music |
| Essential elements of music |
| Chord progressions |
🗓️ Week 3
| Improve improvisation skills |
| Make music spontaneously |
| Improvise blues music |
| Easy piano songs |
| Syncopation in music |
| Practicing piano with metronome |
Author of this blog post:
Susana Pérez Posada

With over seven years of piano education and a deep passion for music therapy, Susana brings a unique blend of expertise to Skoove. A graduate in Music Therapy from SRH Hochschule Heidelberg and an experienced classical pianist from Universidad EAFIT, she infuses her teaching with a holistic approach that transcends traditional piano lessons. Susana’s writings for Skoove combine her rich musical knowledge with engaging storytelling, enriching the learning experience for pianists of all levels. Away from the piano, she loves exploring new places and immersing herself in a good book, believing these diverse experiences enhance her creative teaching style.
Published by Lydia Ogn from the Skoove team


